

A quick recap of my talk at the 2nd React-Native Belgium meetup. Slides can be found here.
I'd like to start this blog post with a quick confession: "I have not always been the best at shipping fast."
Somehow, it always seemed like other devs had a few more productive hours in their day than I did.
Naturally, I had to learn to work smarter.
Ultimately increasing my efficiency when building apps and features.
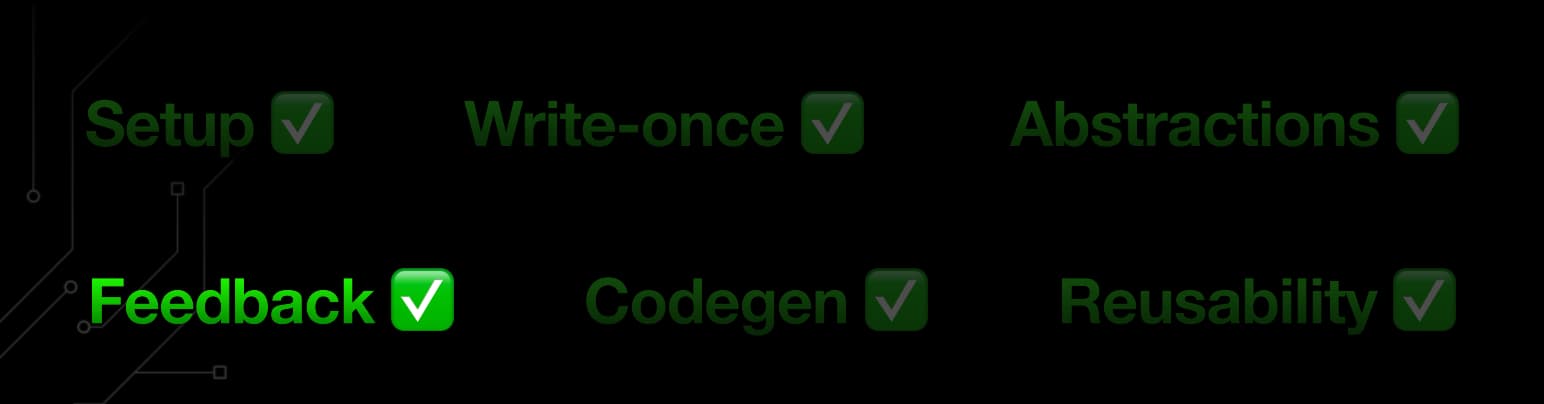
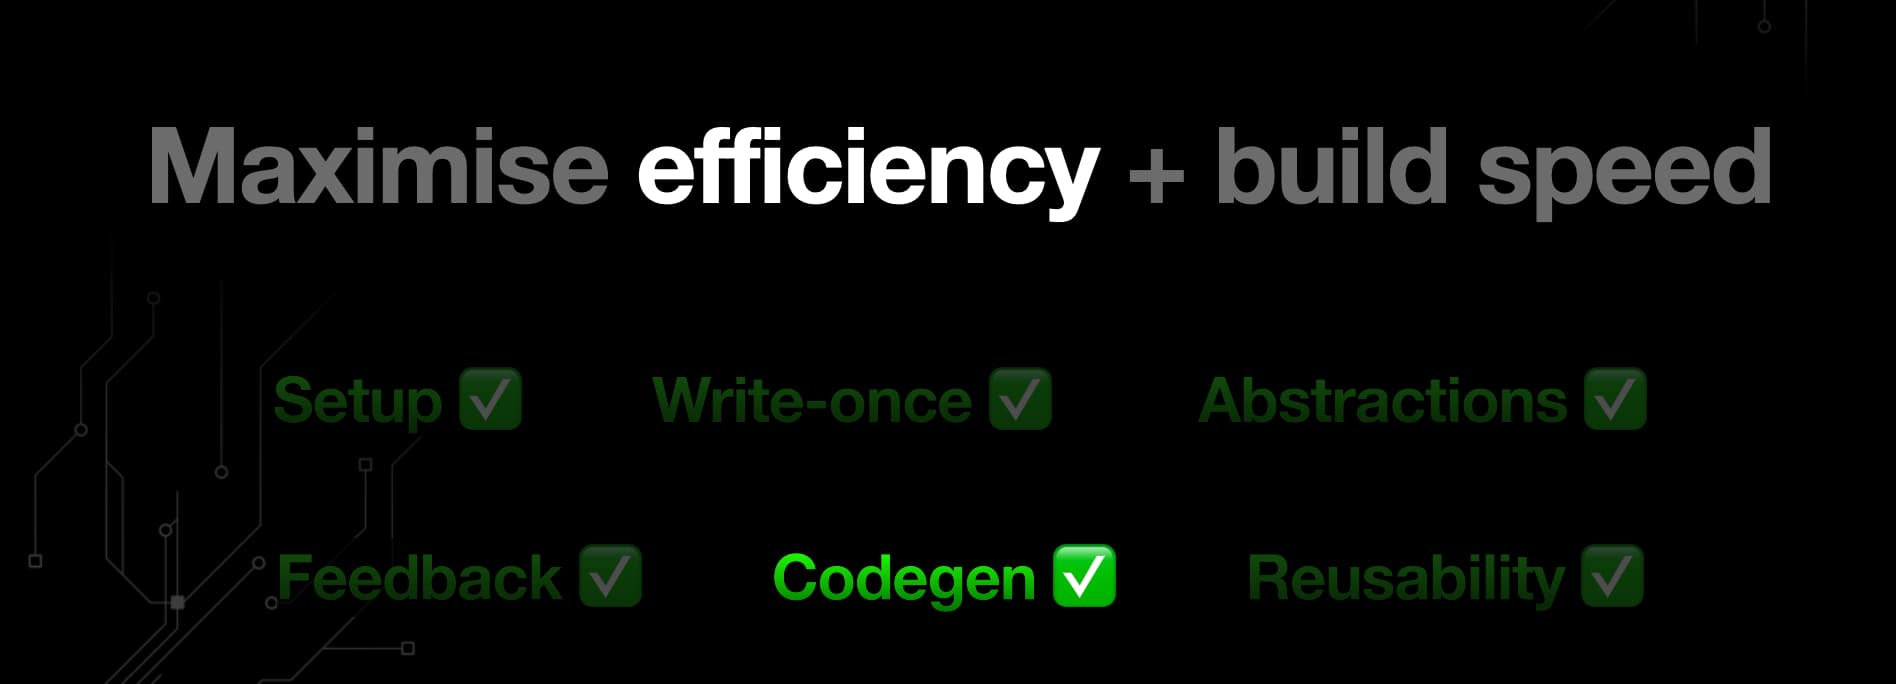
This led me to 6 tips and tricks that I want to share with you today:
- #1 - Don't reinvent the wheel
- #2 - Keeping everything "Write-once"
- #3 - Build the right abstractions
- #4 - Ensuring instant feedback
- #5 - Proper code generation
- #6 - Keeping code as reusable as possible
But let's first start with...
Why shipping fast is important

Remember when OpenAI released their new 4o image generation model?
Everyone was creating ghibli-style images of themselves and memes on the internet.
Well, that's a great example of why shipping fast, and capturing momentum, is important.
Kitze, quite the well-known open-source dev on Twitter, tweeted about how he tried to jump on this hype train. How he tried to build a new app to do this image generation automatically.
It went so far that people were literally sending him their images asking to "convert them to ghibli".
If that isn't a good validation signal, I don't know what is.
But, even though he's quite experienced and skilled, he still got frustrated that he wasn't able to ship a working app in time.
The conclusion of his honest reflection here was that
"People with readymade boilerplates or whitelabel apps have a huge advantage".
And so...
Tip #1 - Never start from scratch

It makes sense, right?
The less reinventing of the wheel you have to do for each project, the faster you can start working on your core features.
I should know, because for the past 7+ years, I've been slowly building and perfecting my own Starterkit.
Now, before you tune out and go "Oh NO, not another boilderplate guy, selling his shovels" ...
I want to clarify that this is not another one of those Next.js web-only boilerplates that have been flooding the market after the success of a specific IndieHacker.
Nope.
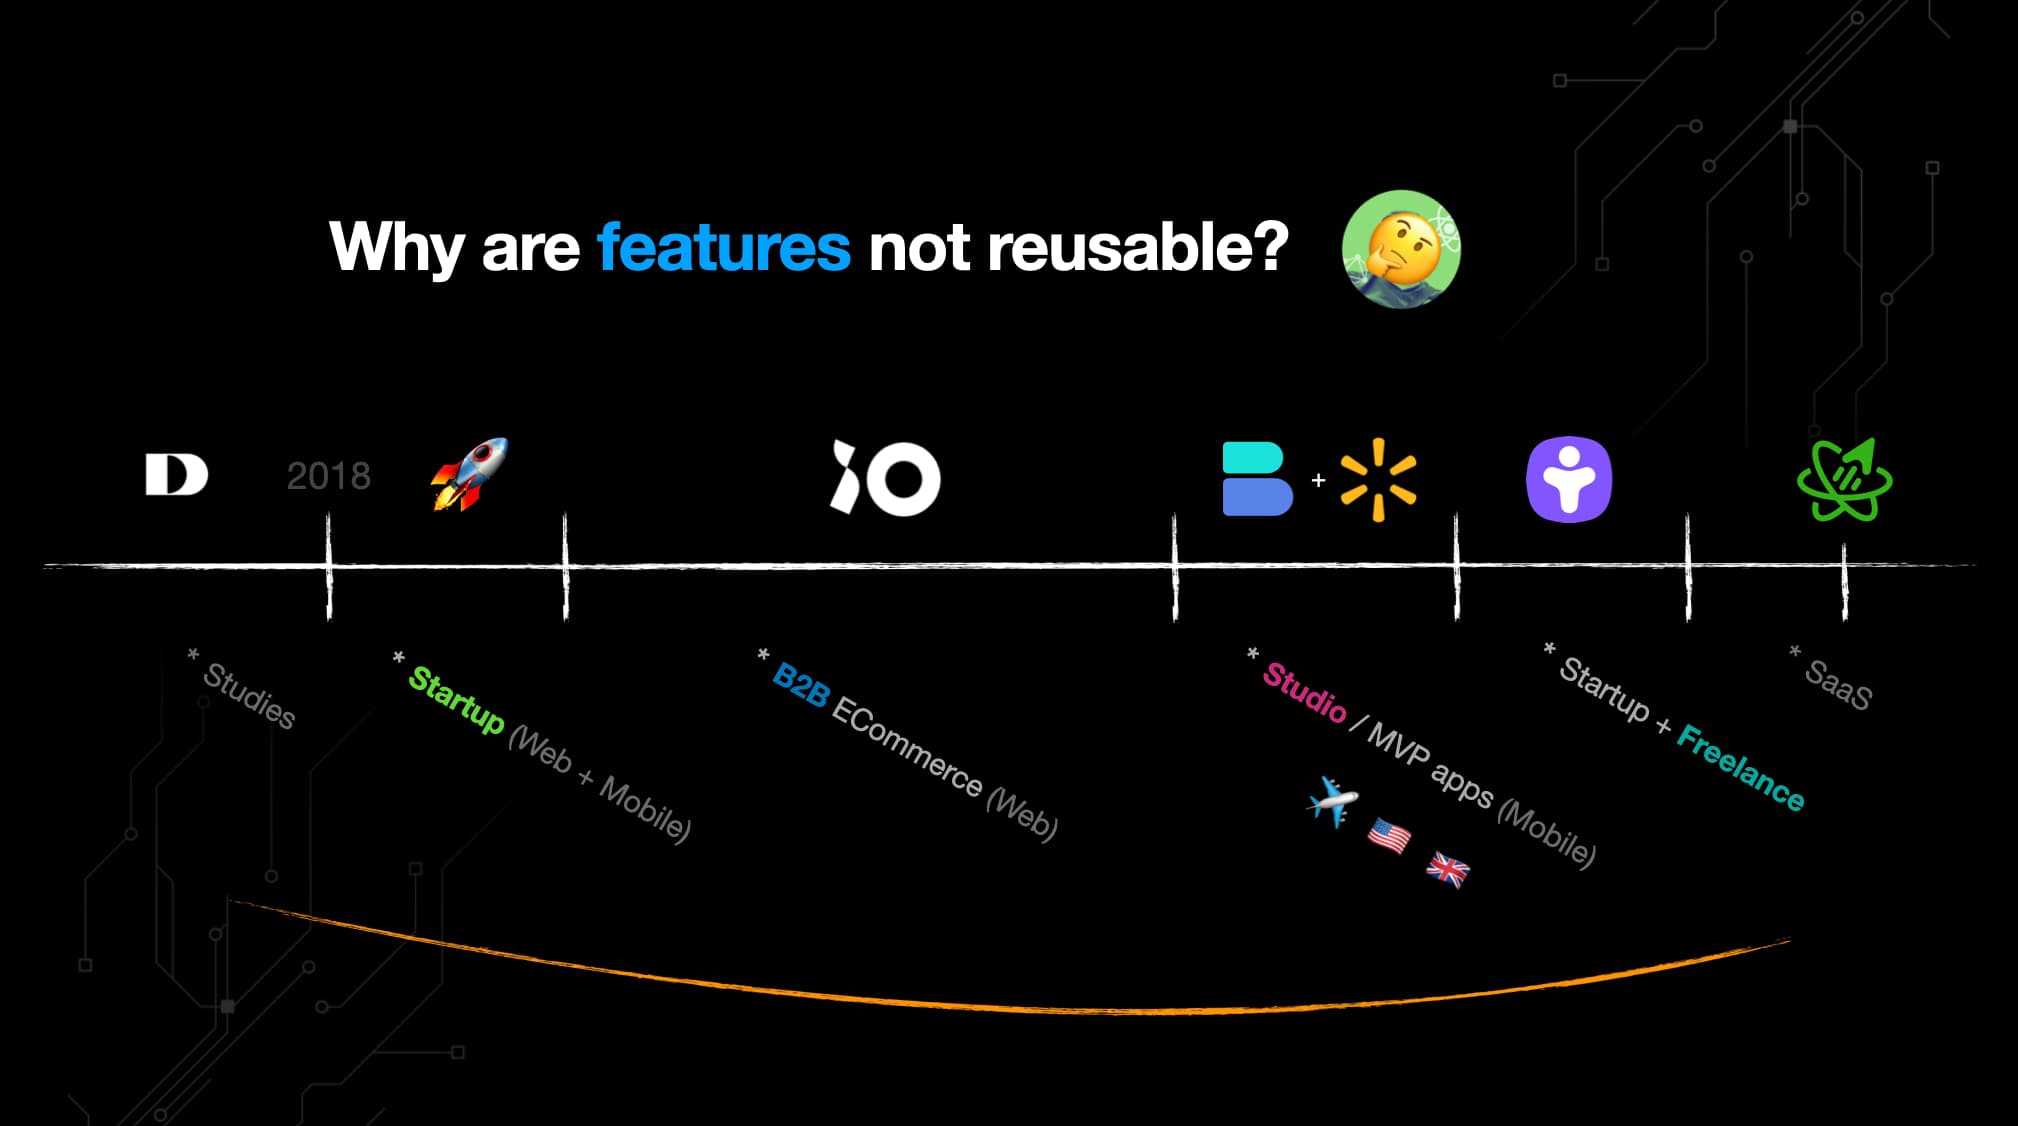
This Starterkit is the result of about 8 years continuing to experiment with cross-platform development.
Ever since react-native-web was released, and all the other releases Expo and the community did to support Web since then.
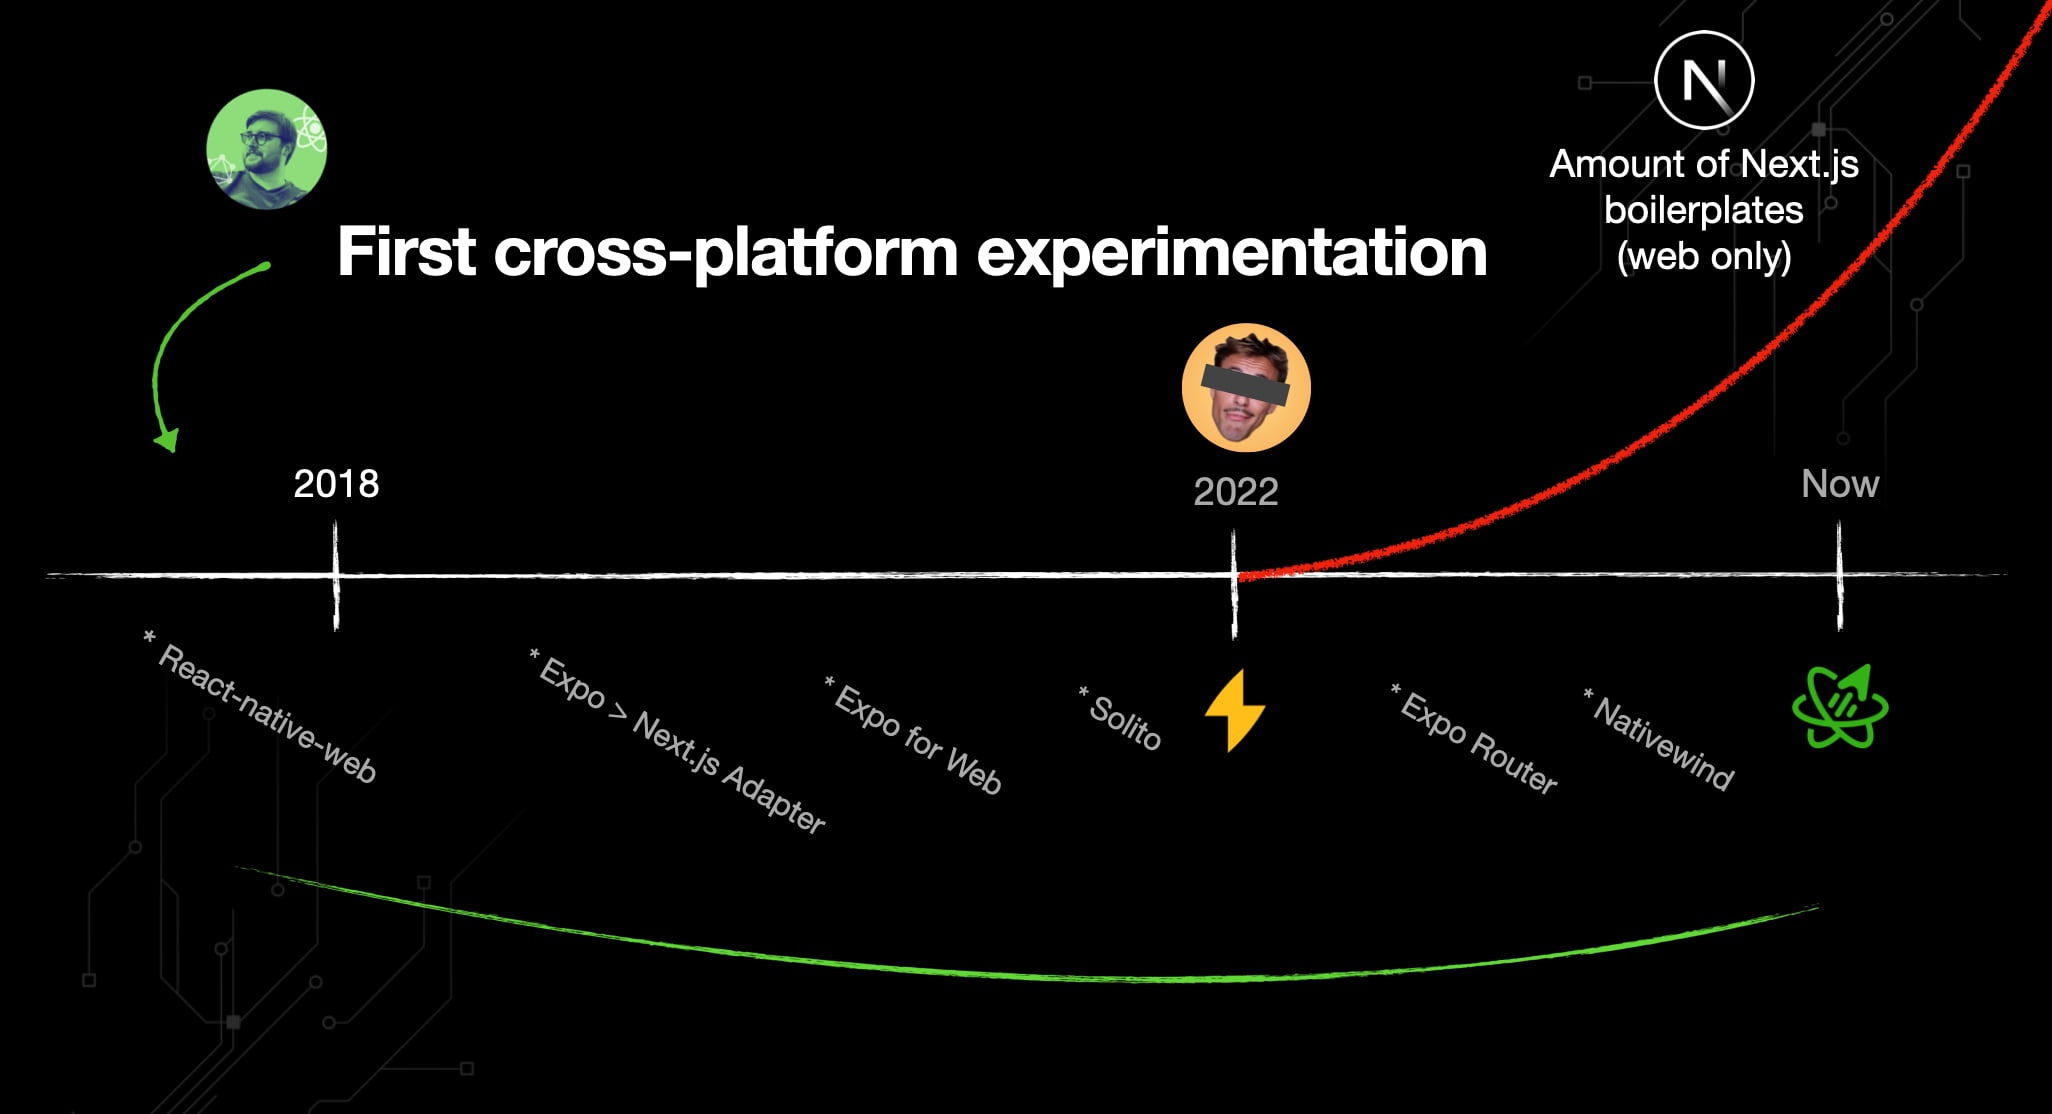
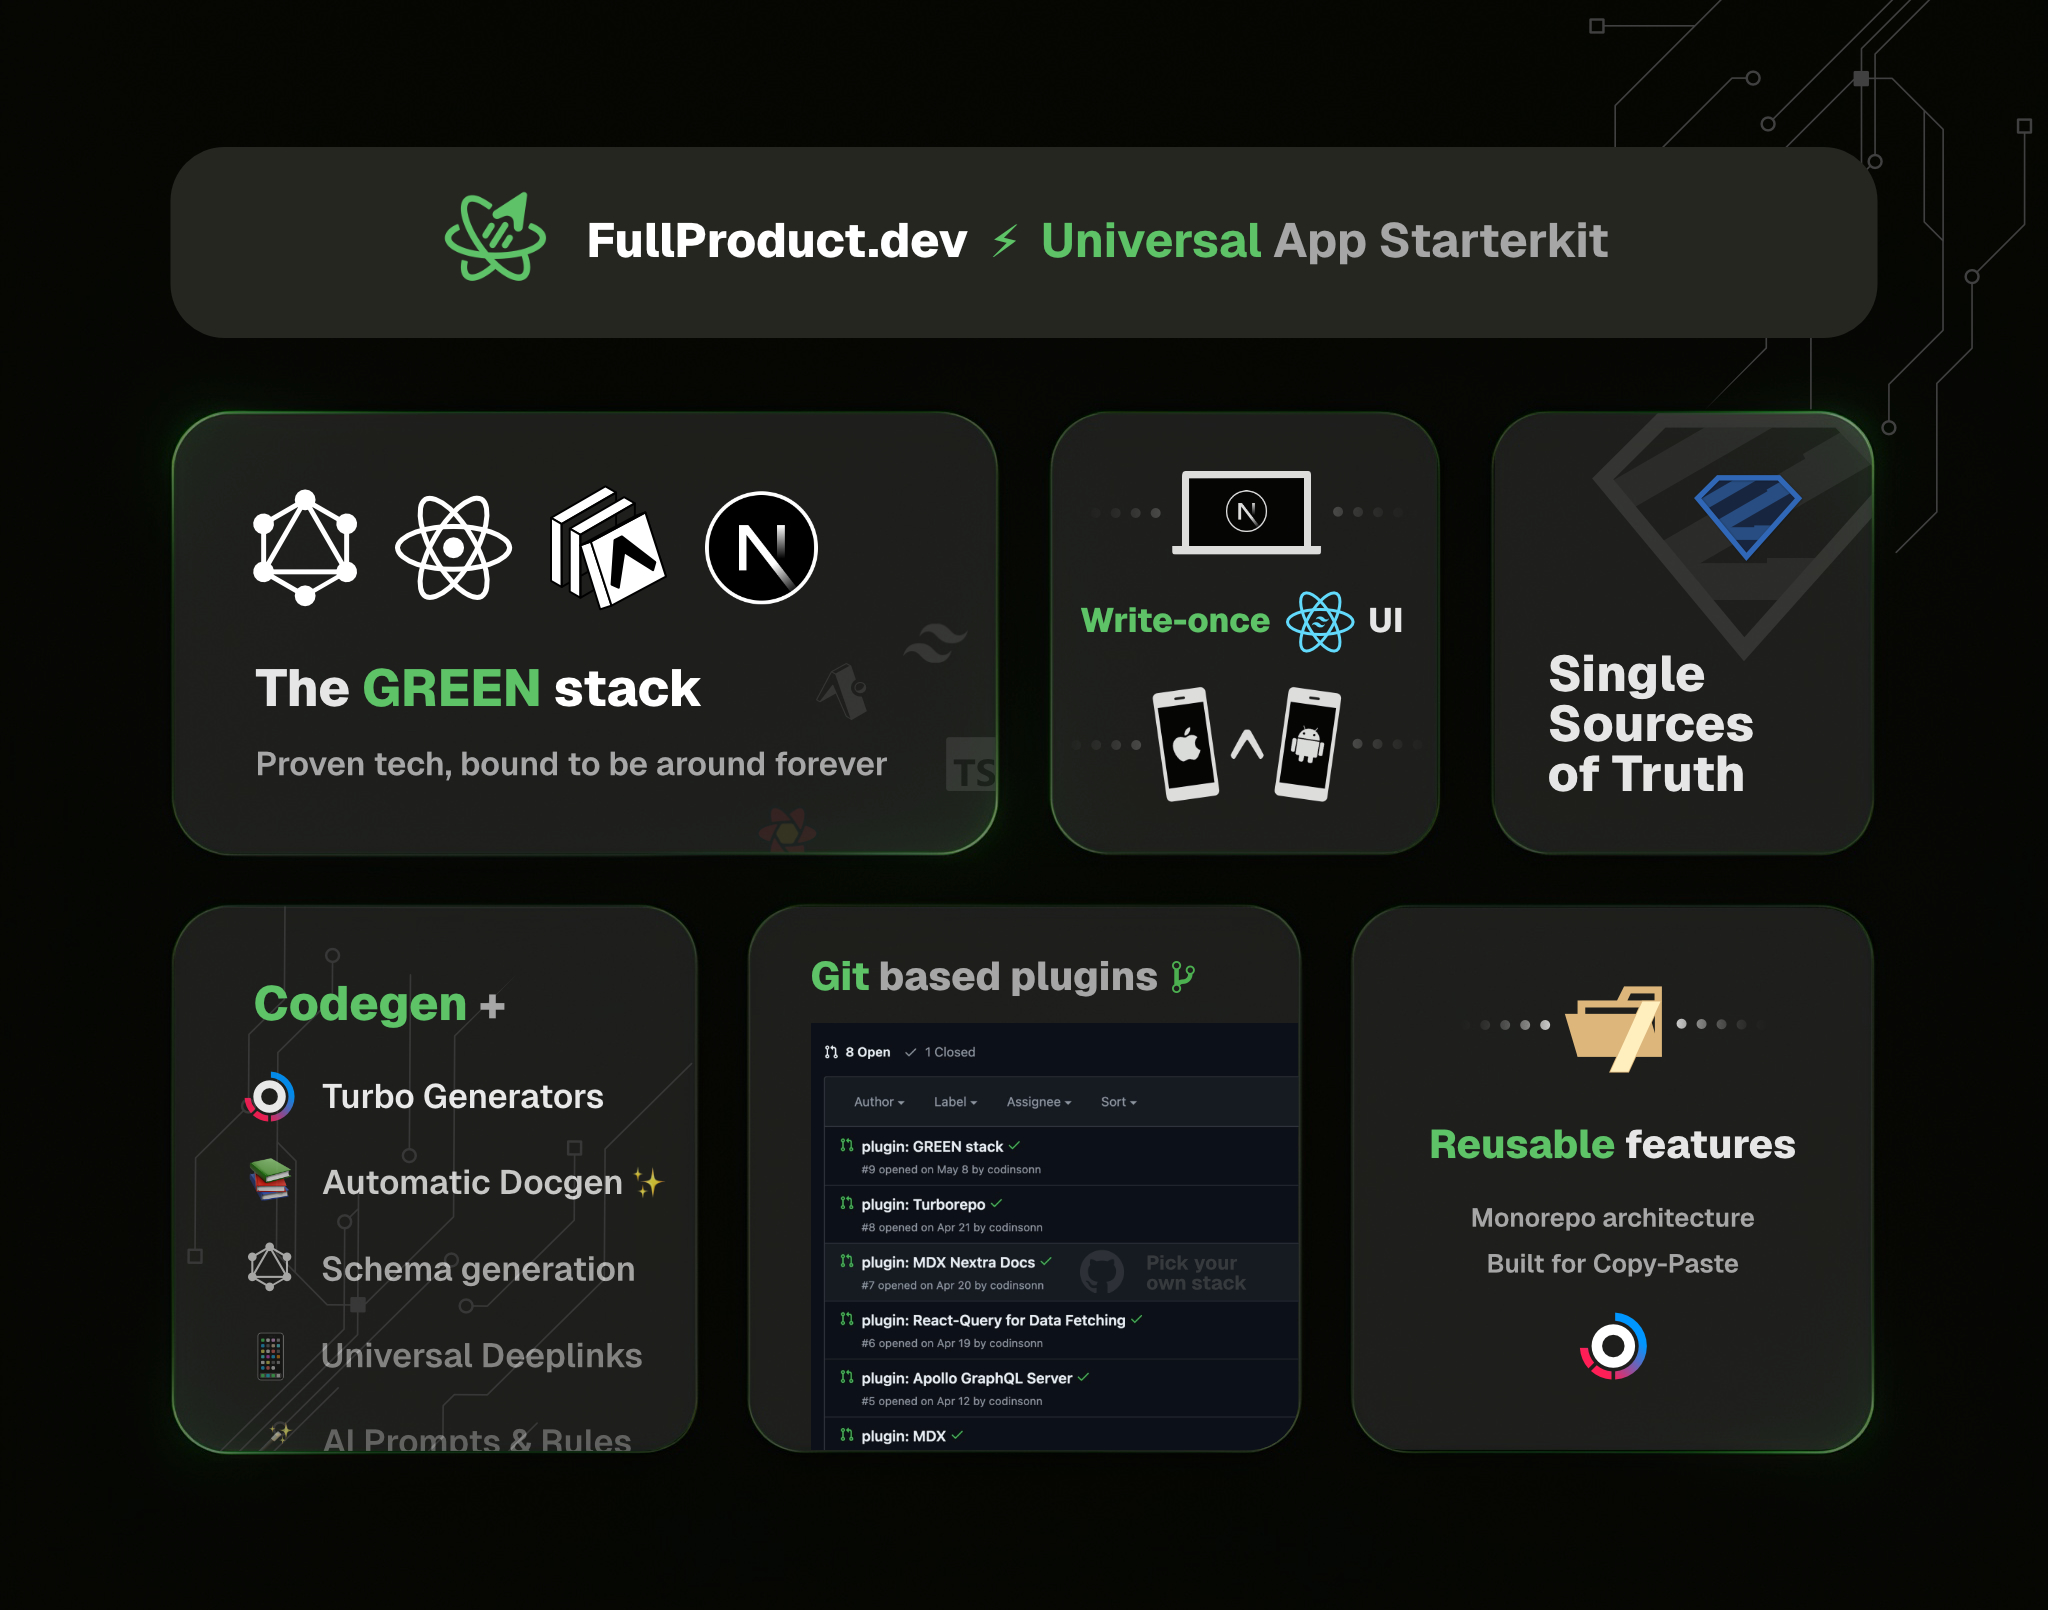
And so, it's not just another Next.js boilerplate. It's a Universal App Starterkit.
Which is, ofcourse, another great way to increase your efficiency as a developer.
Building apps that run on both web and mobile, and keeping the code as write-once as possible.
No native or web-specific rewrites later on. Iterating at the speed of one project / bugfix / feature at a time.
One codebase. All platforms. From the start.
Tip #2 - Write once, run everywhere

There's a lot more to this starterkit than just the initial cross-platform setup.
It's a collection of insights and best practices that I've learned over the years.
But it also includes things I felt were missing during my 7 years of building web and mobile apps.
Which brings me to the other 4 tips I'm going to share with you later in this article.
For now, zooming back in on write-once universal apps, and why they're efficient:

But what enables us to actually build universally these days?
Well, time to reintroduce myself as an "unofficial Expo propagandist" ... and mention that Expo, and the larger react-native community, really have been the champions of Universal App development.
Ever since react-native-web was released, people from the Expo team have been adding a bunch of PRs to popular react-native community libraries to make them compatible with web.
This was quickly followed by Expo releasing their own packages, such as their @expo/next-adapter
You could now combine the best of Mobile (ofcourse being Expo itself), with the best of Web, which is still seen by many to be Next.js for the near future.

This, in turn, led to other solutions being built on top of the Expo + Next.js adapter.
Such as Solito by Fernando Rojo, which was quite popular because it added some extra routing API's to make it and even smoother experience building for each platform.
Which, ofcourse, spurred even more PRs and fixes to react-native community libraries.
Such as web bundle optimizations, and things like server rendering support
All of this already made building Universal Apps a lot easier.
So, imagine my surprise when...
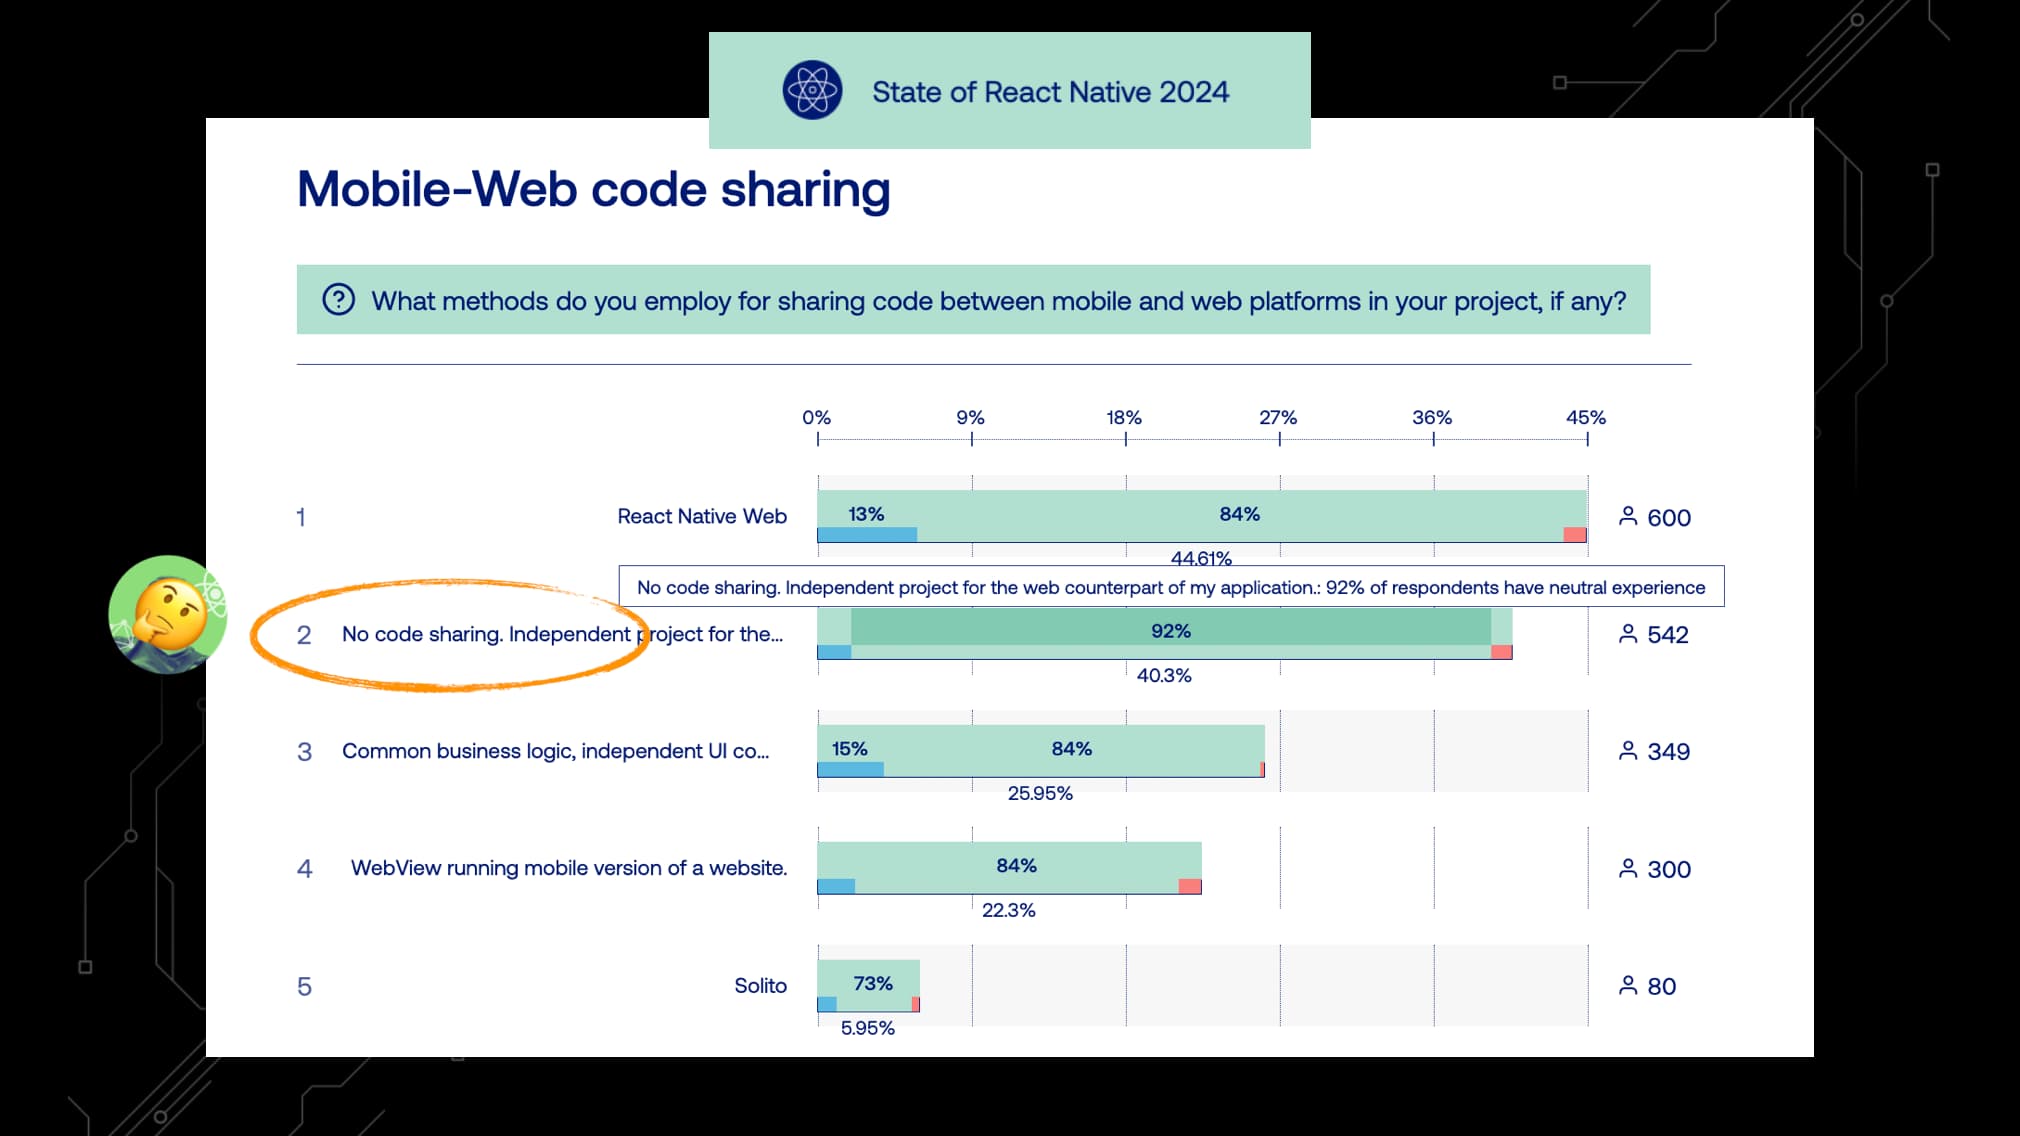
In the State of React Native survey 2024, while react-native-web was quite popular, it still seems like a lot of react-native devs are not sharing code between web and mobile.
With the third most popular answer being that some common business logic is shared, but there are still two separate codebases.
Which seems like a missed opportunity.
Maybe not everyone knows how to build cross-platform apps yet?
So, time for a refresher.
Basics of Universal App Development - with Expo and react-native
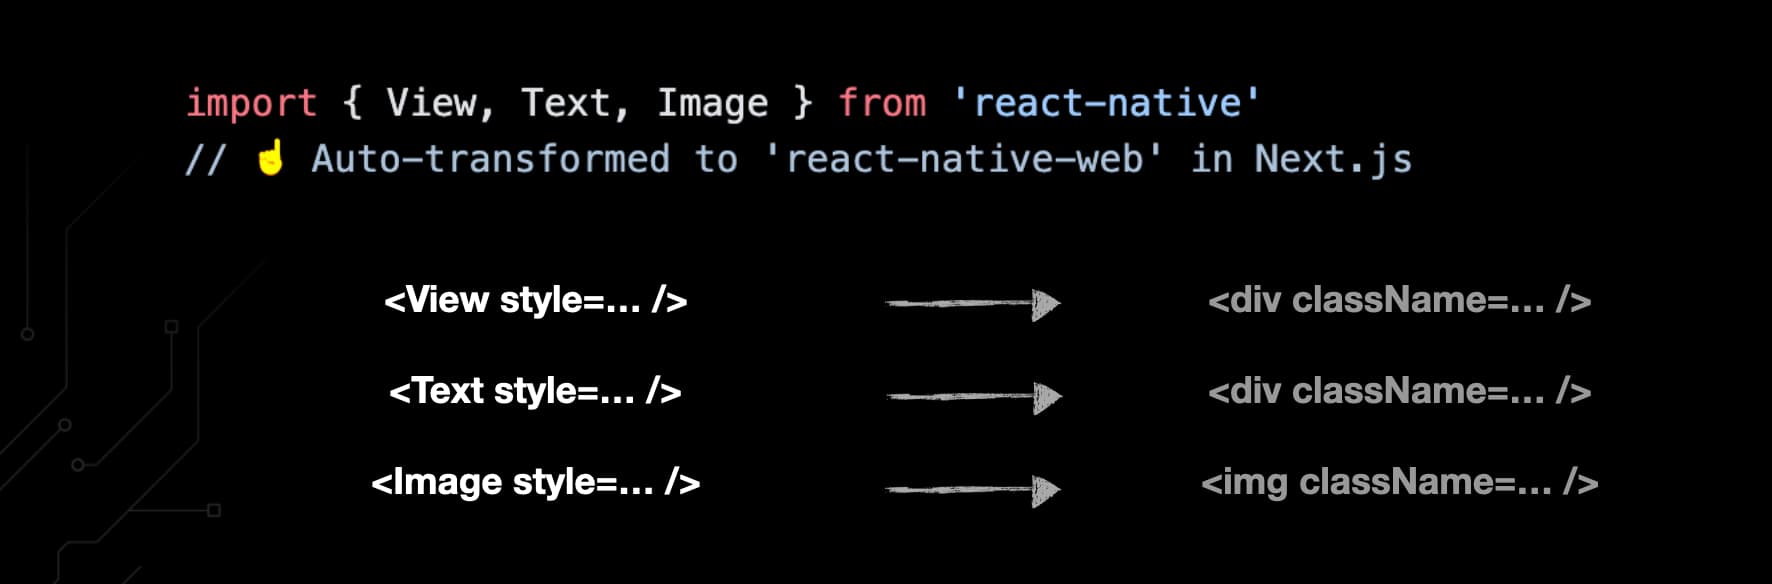
Instead of your divs, h1 tags, span tags and img tags, you'll import the react-native primitives instead.
Expo for Web will then transform your View / Text / Image primitives back into react-native-web and DOM in, for example, Next.js.
By default, you won't be using any classNames, and will style these primitives using style objects or the React-Native StyleSheet.
Enter - NativeWind
NativeWind does allow you to use tailwind classNames for styling, even for Mobile.
The way this works is as follows:
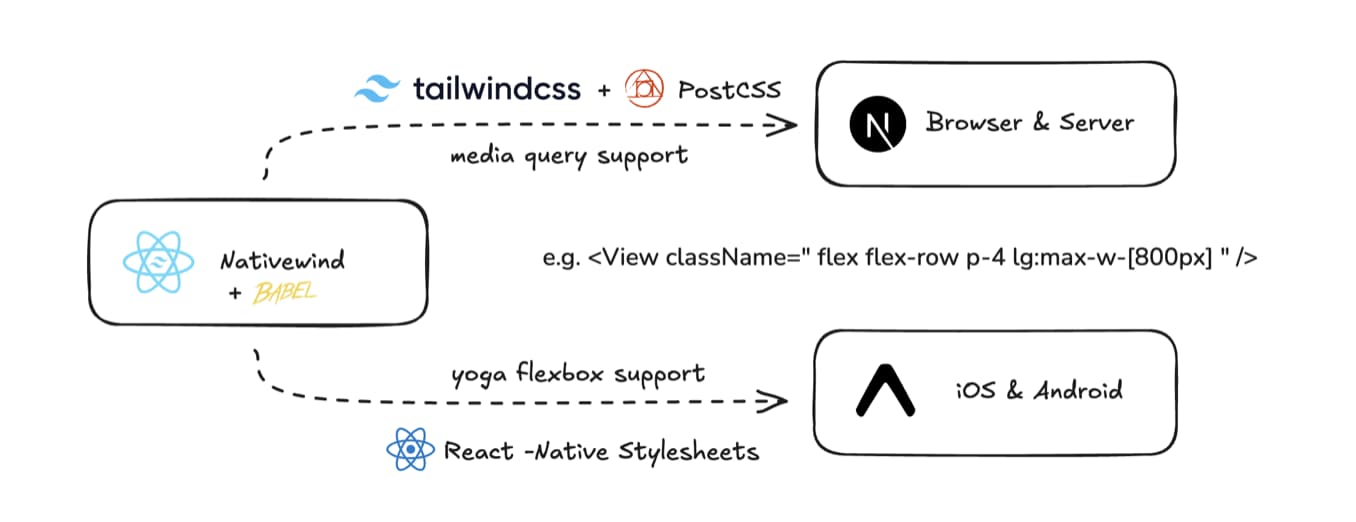
On the web, NativeWind is just a tiny wrapper around tailwindcss.
This ensures that things like media queries work as expected, even when doing server rendering...
... avoiding issues like layout shifts when the page is hydrated.
On mobile, however, NativeWind classNames get transformed to react-native stylesheets.
For now, there is the caveat that not all classNames are supported on Mobile.
But until this inevitably gets better with new react-native releases, you can basically build any UI using flexbox based classes.
And so, you already have write-once universal-ui primitives that will be optimized for each platform.

What about Universal Routing?
Cross-Platform UI is great, but what about routing?
Aren't these two different paradigms that we need to think about?
You have the web, which is URL based.
While on Mobile its often a stack based navigation where screens are layered on top of each other.
As mentioned before, historically you have projects like Solito that provide some extra routing API's to help keep things like your routing write-once.
There's other solutions, like this very Starterkit, that provide a similar API.
Most even go as far as to provide in-editor hints for your available routes.

Could be a handy feature to have.
The best solutions these days though, will likely be leveraging Expo Router
Which comes with its own handy APIs for universal Links, Redirects and router hooks.
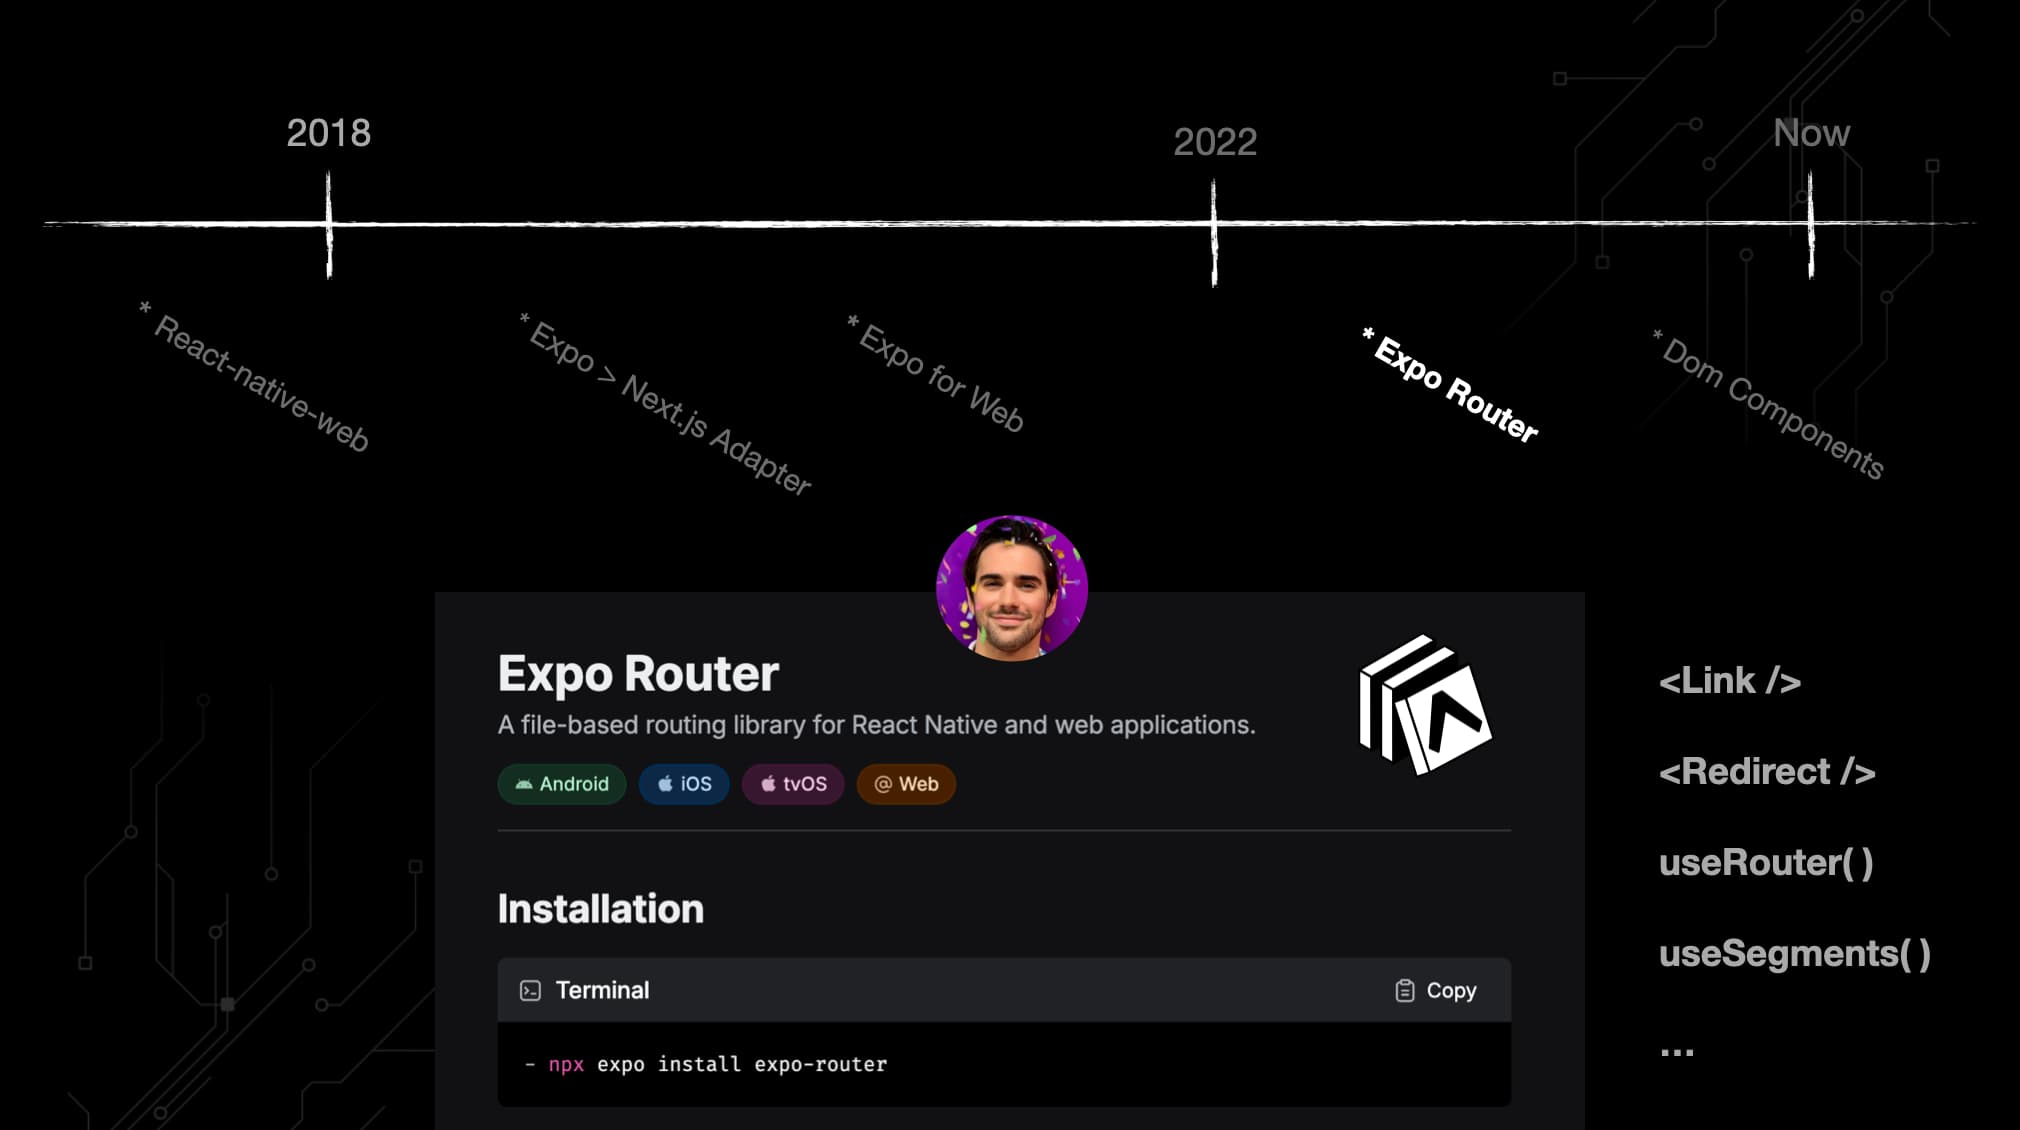
This is what I mean when Expo, and people like Evan Bacon, have been the champions of Universal App development.
Because Expo Router is the first ever file-based navigation solution for Mobile.
Meaning that any file you create in your app directory, can be turned into a functional URL based route.
The resulting route is automatically deeplinked.
So it opens in the right place when coming from a link if you have the app installed already.
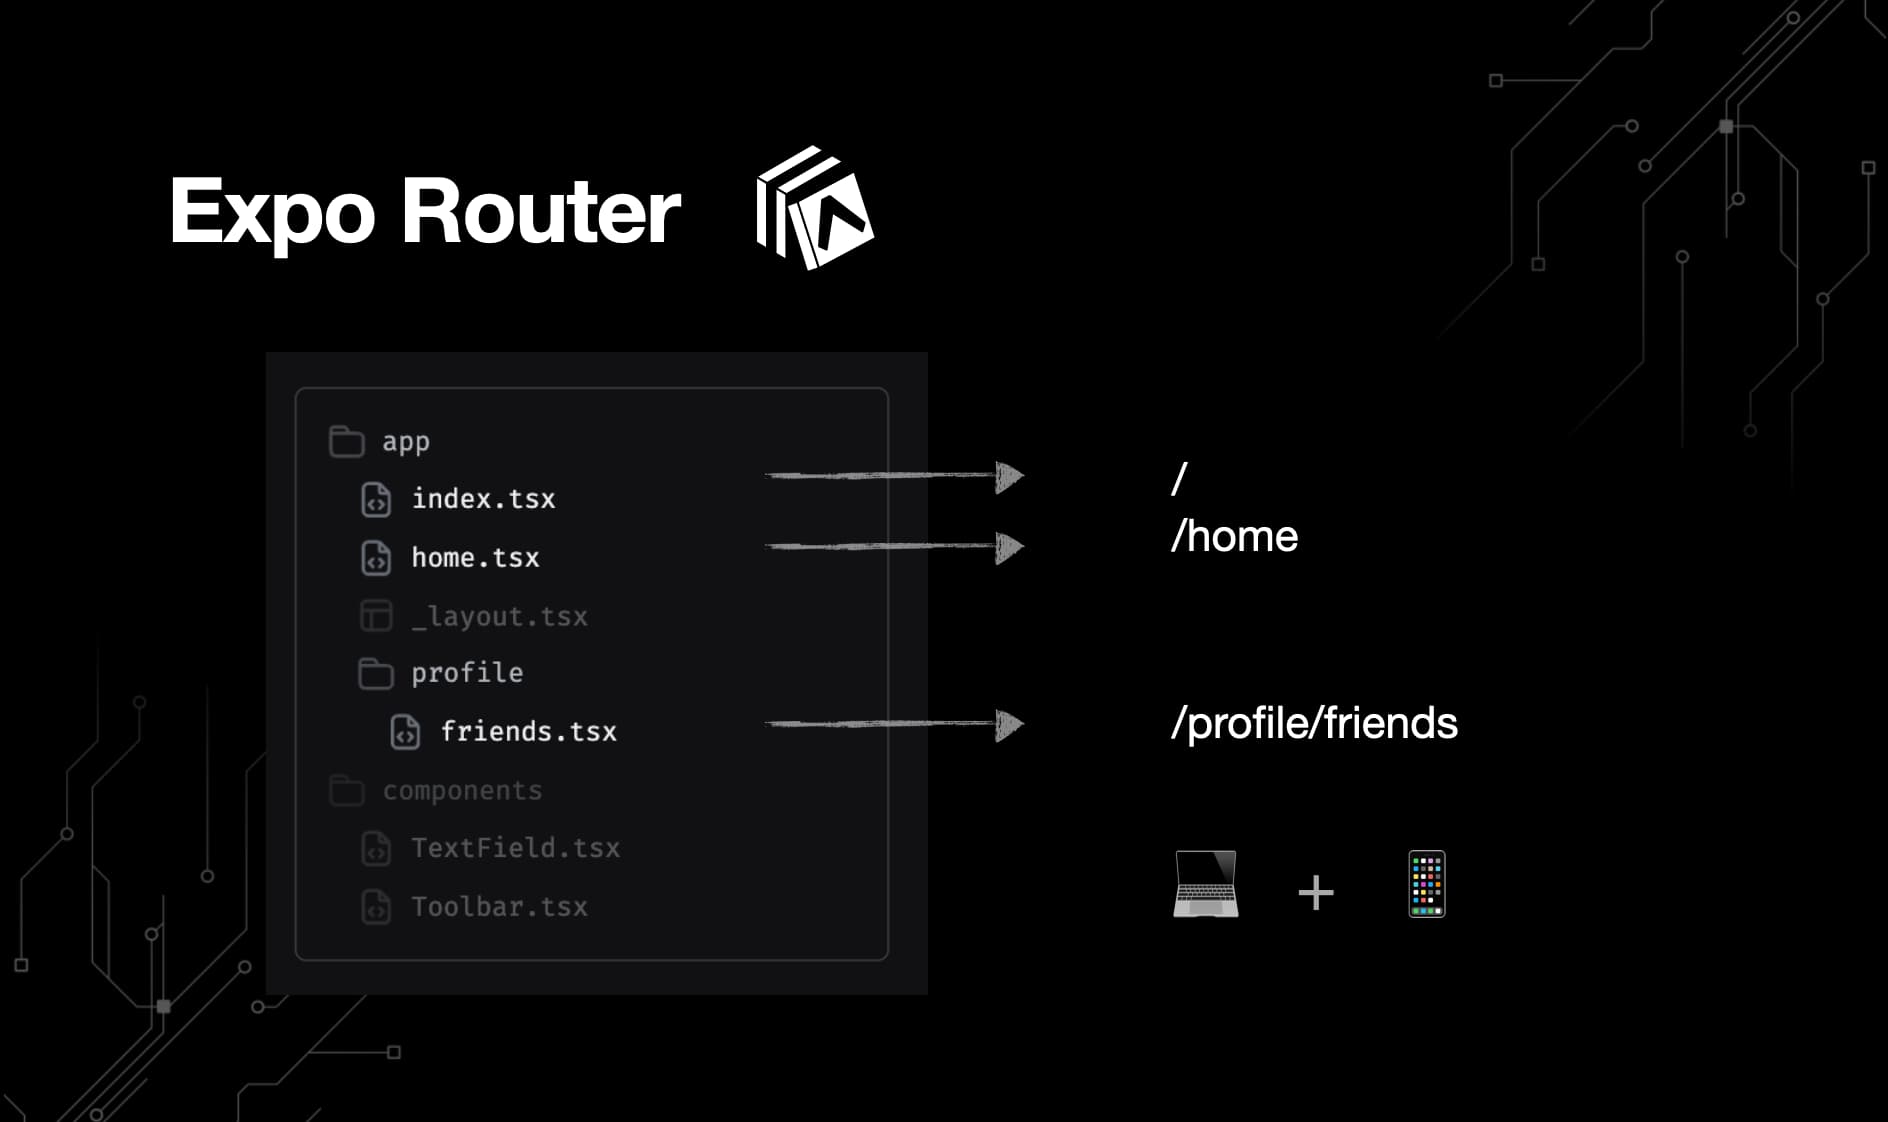
The idea is simple.
Need a homepage? Create a file called index.tsx in your app directory.
Want that home page to be accessible on /home? Create a file called home.tsx.
Want to build more complex routes? Simply name your folders and files to create the desired URL structure.
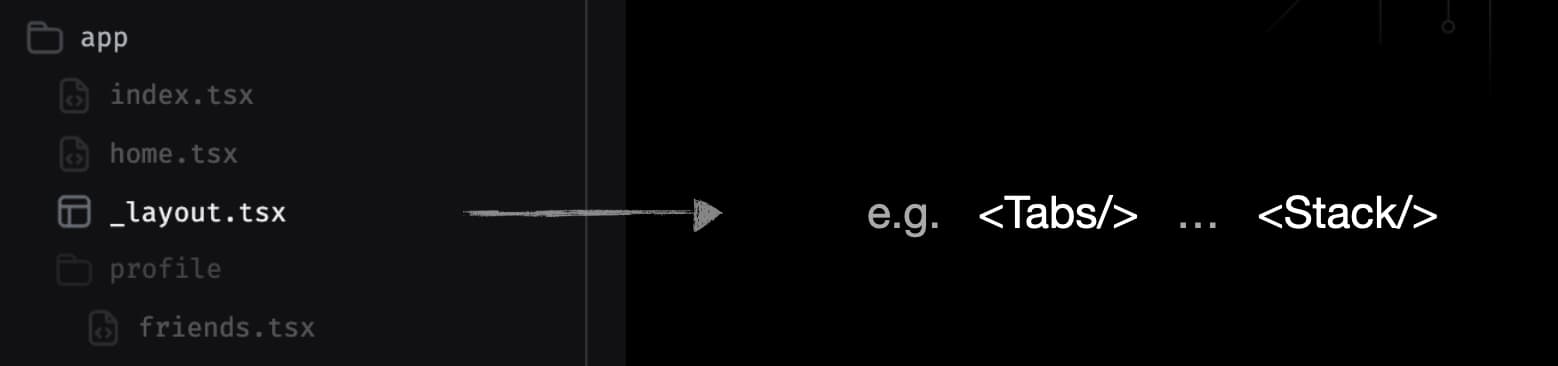
Want to use a tab bar or include stack navigation?
You can configure all that in a _layout.tsx file.
All of this is using the popular React Navigation library under the hood.
And, the file-based routing conventions work quite similar to the Next.js App Router.
You don't need to use Next.js, ofcourse, since Expo has it's own web version.
But it does mean that if you do want to leverage Next.js aside from just Expo, you can.
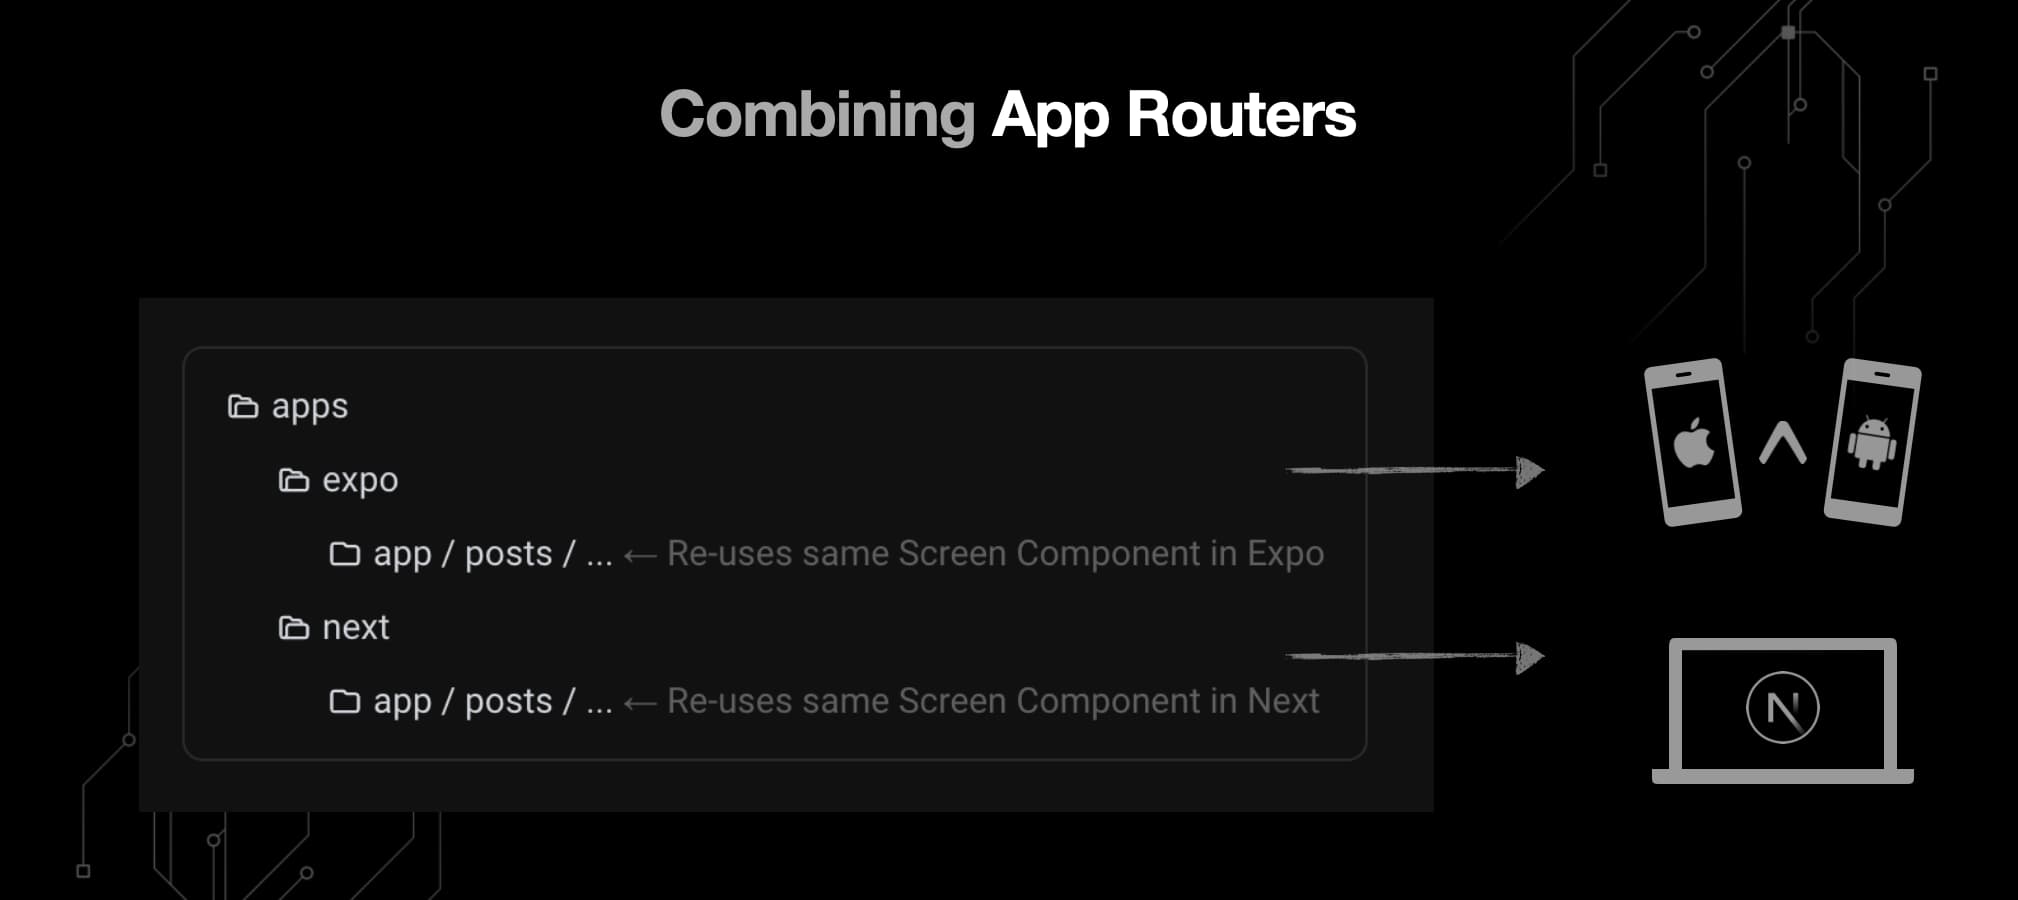
In which case, I advise you define the router separately for each workspace
(often, an /expo/ and /next/ folder in a monorepo)
But make sure to render the same <Screen/> component in each route to avoid code duplication.
All of this is great, but what if you only know web development so far?

How can you reuse your existing regular React web code?
Well, the Expo team has also been wondering what that might look like:
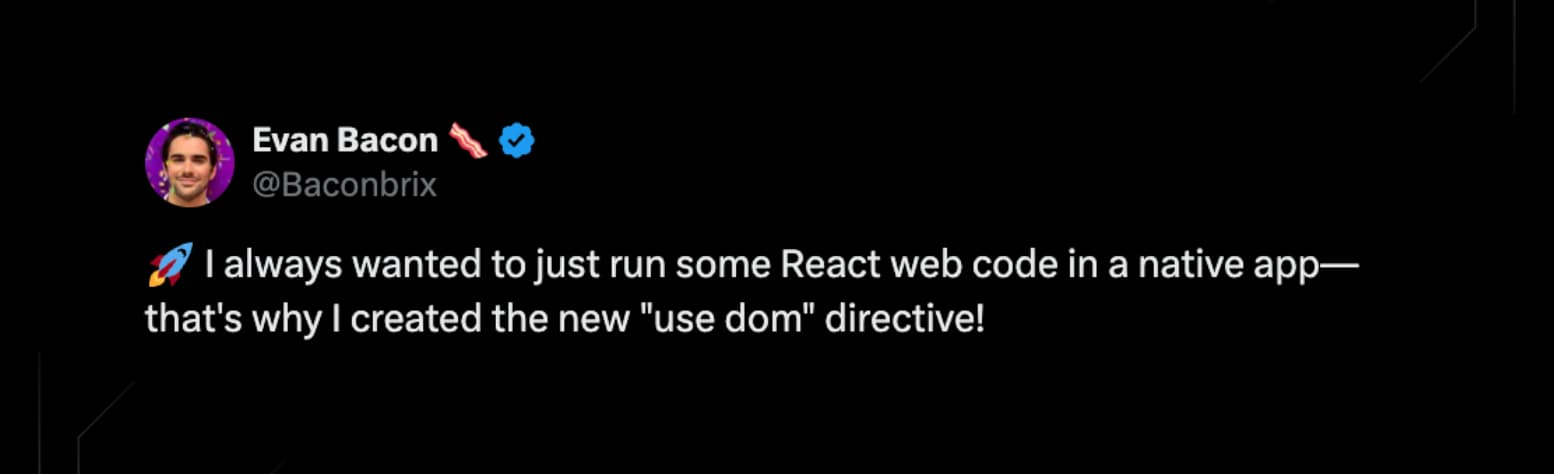
Reusing Web code with Expo DOM components
Since the release of Expo SDK 52, you can now use the "use dom" directive.
This allows you to use regular React DOM components in your Mobile apps built with Expo Router.
Which, in turn, means you can actually use popular web UI libraries like shadcn/ui.
Just add "use dom" to the top of your file, and Expo will render that specific component in a WebView.
Their first demo of DOM components had a full-blown app using shadcn/ui, and it worked like a charm.
But the goal is mainly to enable web devs and projects to easily migrate to React-Native.
If you want to use something like shadcn/ui on mobile, but still want it to be optimized for Native, you should still go with something like react-native-reusables

There are some cases though, where it does make perfect sense to use DOM components, even if you already know and build with react-native.
A really clever use-case the Expo team demoed on their Youtube channel, was using DOM components to bring web-based rich text editors to Mobile apps.
Definitely worth checking out if you haven't found a great rich text editor for Mobile yet.

Finally, Expo has introduced React Server Components for Expo Router.
Which is, ofcourse, another advancement that bring the way of writing Web and Native apps closer together again.
That's all I have when it comes to keeping your code write-once for Web and Mobile for now.
Which means it's time to move on to the next tip to increase our efficiency when building apps.
Tip #3 - Build the Right Abstractions

As Matt Pocock (the main Typescript guy on Twitter) says:
"The Right Abstraction can save your weeks of work".
But he also makes an important sidenote that you shouldn't over-abstract.
You should be ready to eject from your abstractions when it makes sense to.
So, what ARE the "right abstractions"?

This is where FullProduct.dev really sets itself apart from other solutions.
We are convinced that validation schemas, and building tools around them are the best way to automate and abstract.
And we think that Zod is the best library to build these abstraction around.
TS and Validation Schema basics with Zod
If you don't know Zod yet, you could think of it as the "Tailwind of Validation".
It's a Typescript-first schema validation library:

You might know it from the popular tRPC library.
Which is a library that allows you to build End-to-end typesafe APIs.
The way it's able to provide this 100% type safety at runtime is by using Zod for their Input validation.
Because it's built in this Typescript-first way,
Zod already acts as a Single Source of Truth coupling both validation and types.
Meaning that these will never get out of sync.
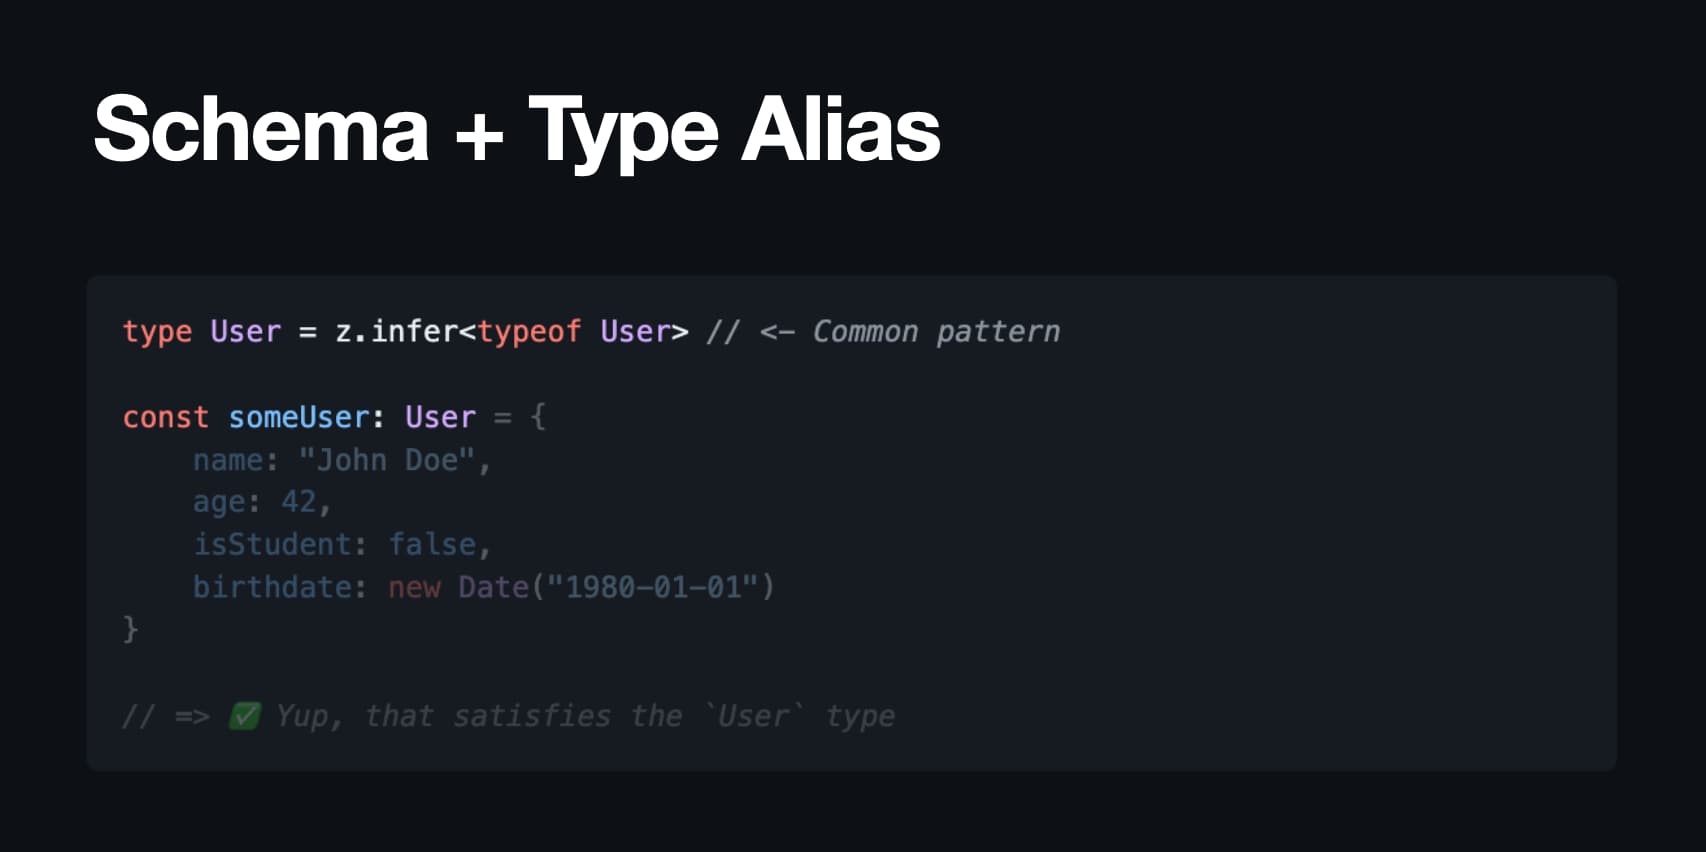
The way you typically extract types from Zod schemas is by using the z.infer / z.input / z.output utilities.
You could even give your schema and extracting type the same name for easy importing and referencing.
Typescript will know when to use the schema and when to use the type automatically.
As will your editor and compiler to provide errors in time.
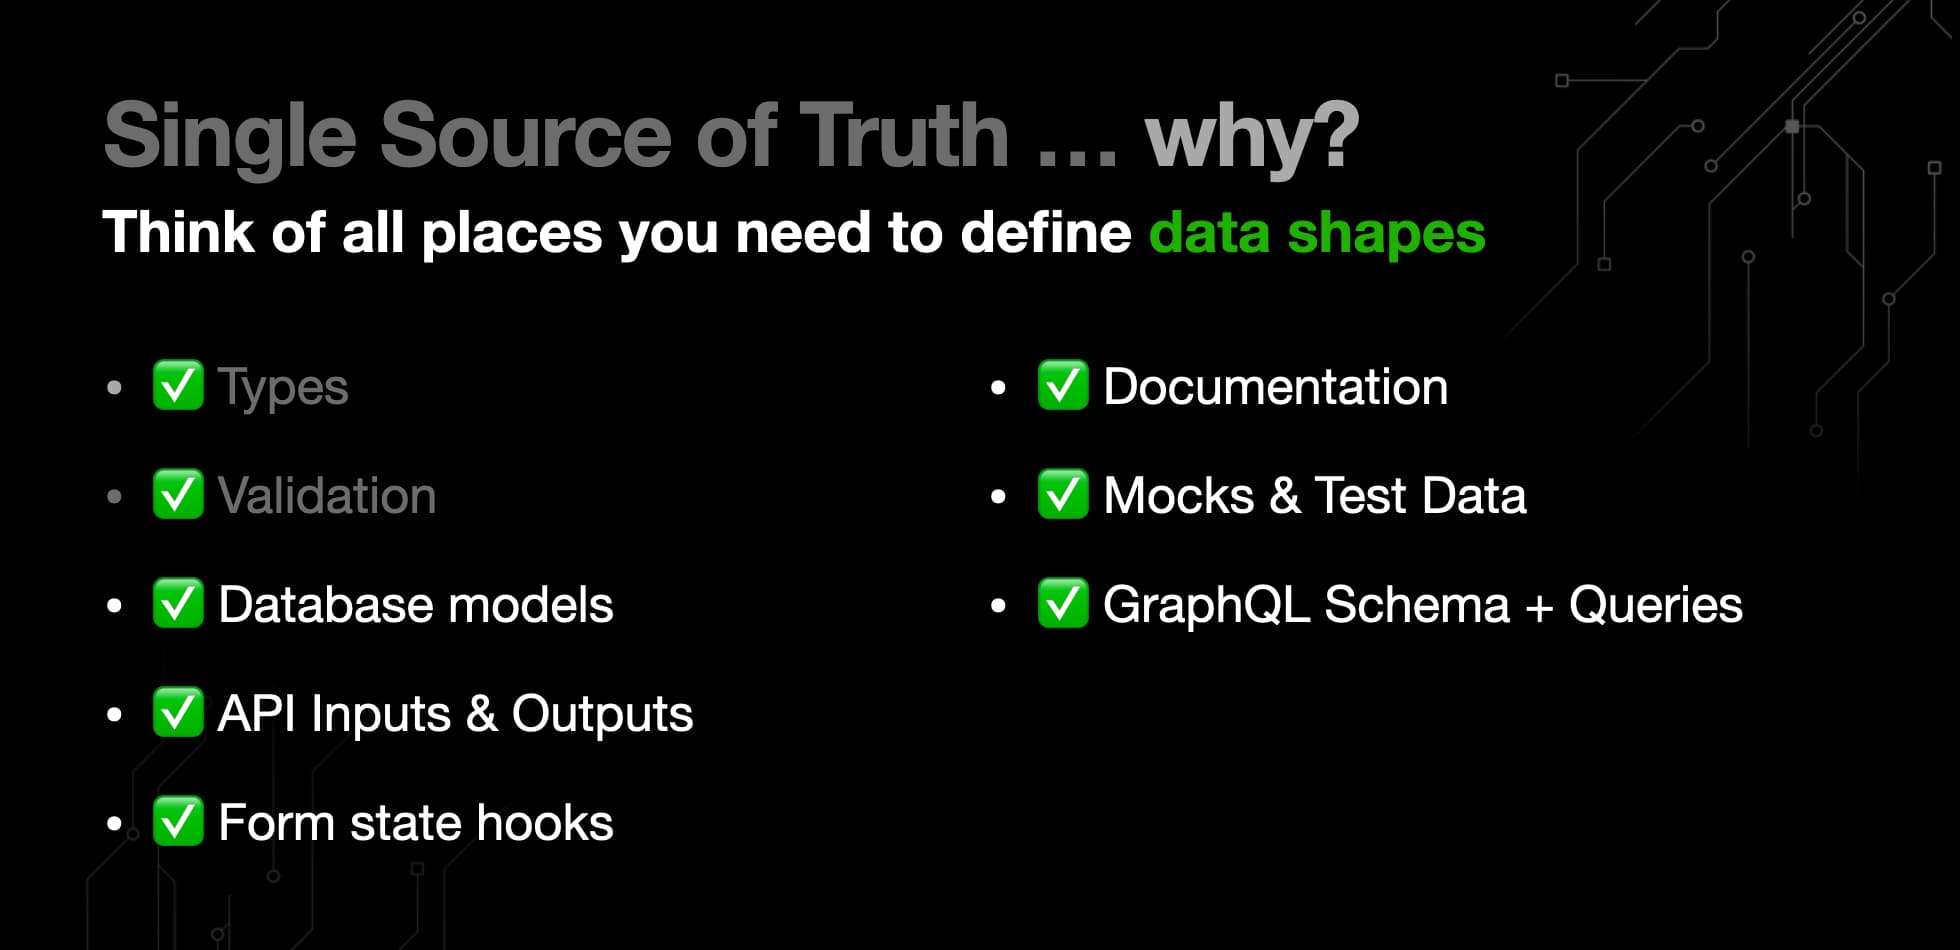
Why abstract based on schemas?
So why do it? Why is this the right abstraction?
Well, think of all the places you need to define data.
We already covered validation and types.
But where else might you redefine the shape of your data?
The answer, based on how big your app is, is probably a lot:
What are the risks of redefining the shape of your data for each of these places?
Well, think of all the things that could go wrong:
- You could forget to update one of the places
- Meaning they could get out of sync
- Meaning you might have outdated docs, or worse, outdated types
All of these often lead to the main risk of not keeping things in sync:

That's right. Outright bugs or crashes.
In a way, you really want your code editor to scream at you with it's squiggly red lines at the earliest possible moment.
Side Tip #4 - Ensure fast, near instant feedback loops
The faster you know something's wrong, the quicker you can fix it.
You really don't want to be waiting for your CI to run, or issues to show up after deployment.
But, back to writing the right abstractions, so we can ensure those fast feedback loops.
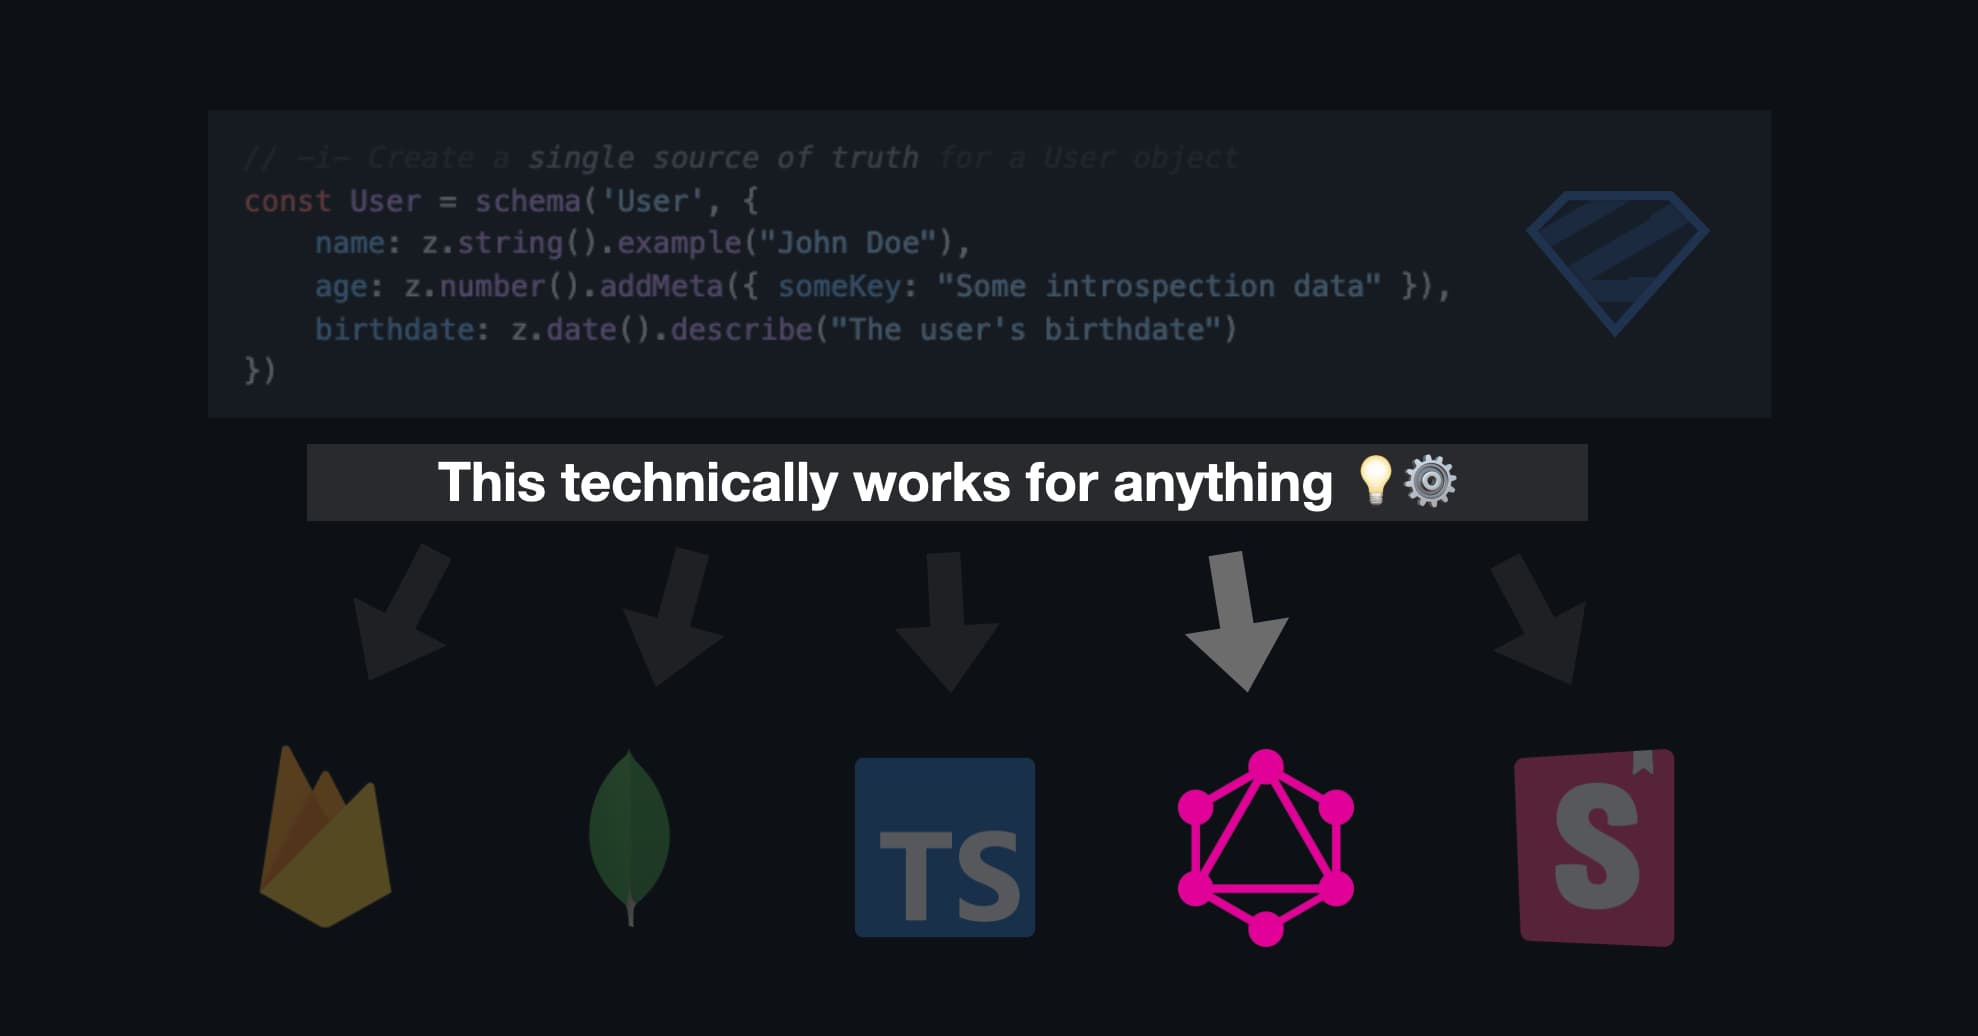
💎 Defining the shape of Data - Just. Once.
What if for all your Types, Validation, DB models, API inputs, Form Hooks, Docs, and GraphQL queries...
... you could just define the shape of your data in one go...? While keeping it all in sync?
If your Zod schema could do that, things could never fully get out of sync. Problem solved, right?
Well, you'd first need to be able to transform to these other formats first, ofcourse.
Let's think about what an 'Ideal Source of Truth' would look like:
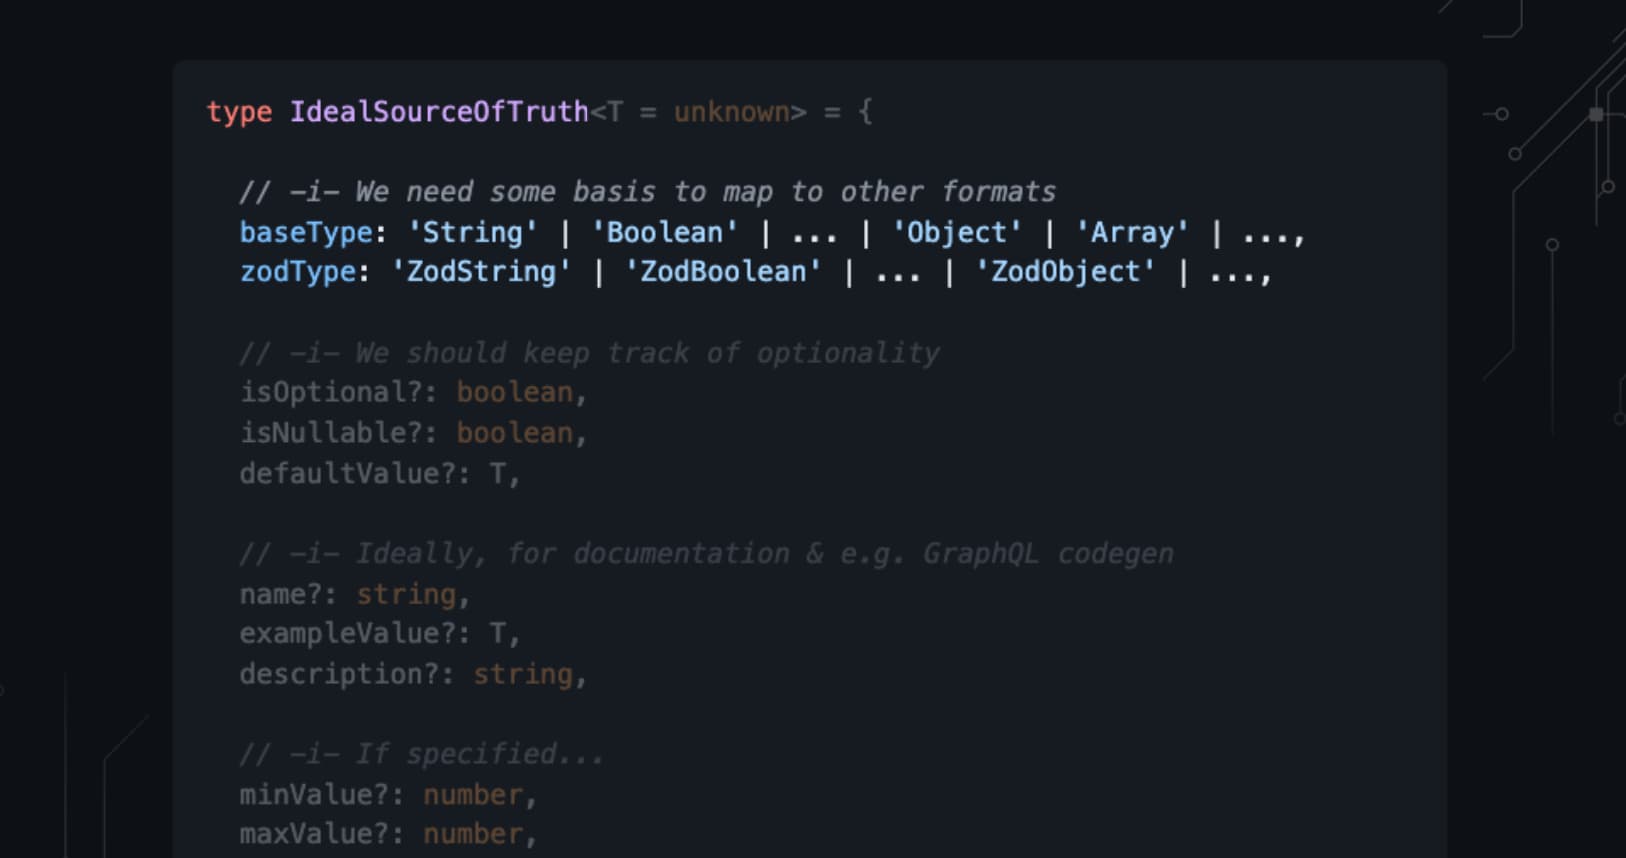
First of all, you'd need some basics to map to other formats.
Things like, "Is this a String or a Boolean?"
Then, you'd have to track whether certain fields are required or optional.
Are they nullable? Do they maybe have a default value?
If we're going to keep our docs in sync as well, we need things like exampleValues and descriptions.
You could even go narrower than Typescript can and track things like
- the minimum or maximum values for numbers
- the minimum or maximum length for strings
- ... even regex patterns could be good metadata to have...
So, what * was * missing in Zod?
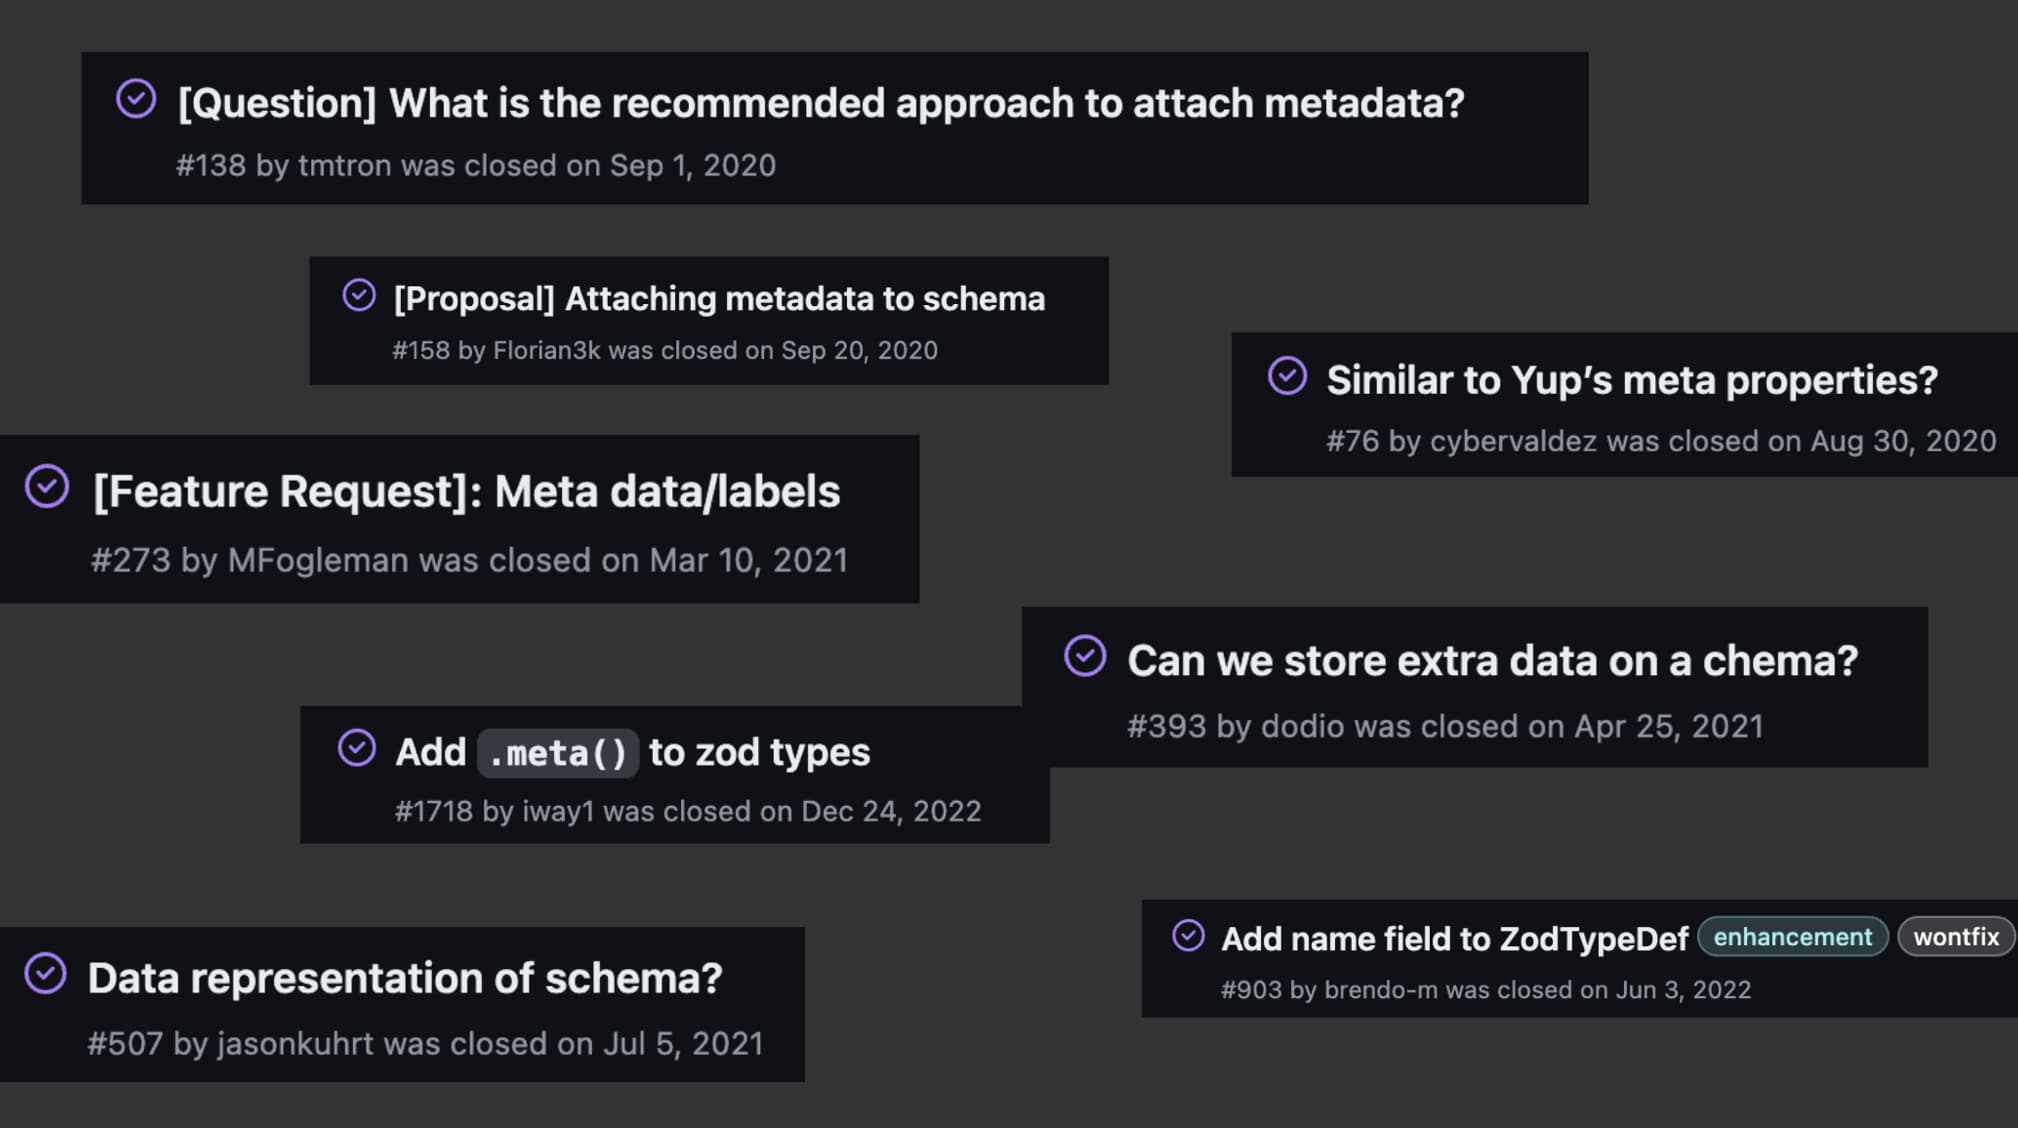
Quick update: Zod will add metadata support in V4! 🙌 It's currently in Beta, but we're adding V4 support as we speak already.
Awesome as Zod is as a library, it did not have the rich metadata and introspection APIs we need to transform to other formats.
They've gotten better at this recently though, with things like ensuring a standard schema to integrate with other tools.
Luckily, FullProduct.dev has always had a way to add and introspect rich metadata from your schemas.

All it took was some slight extending of the Zod module.
Typically, that could be seen as dangerous, but just adding things instead of editing the prototype, is actually pretty safe.
The end result are metadata APIs that can be chained just like Zod's own APIs:
- e.g.
z.string().example('Hello World') - e.g.
z.number().addMeta({ exampleValue: 42 })
If you can make an additional API feel as if it's native to something that exists, that's always going to feel better.
On top of that, extending the Zod module also ensures that there are correct types for these extra APIs.
So, what does the result of calling .introspect() look like?
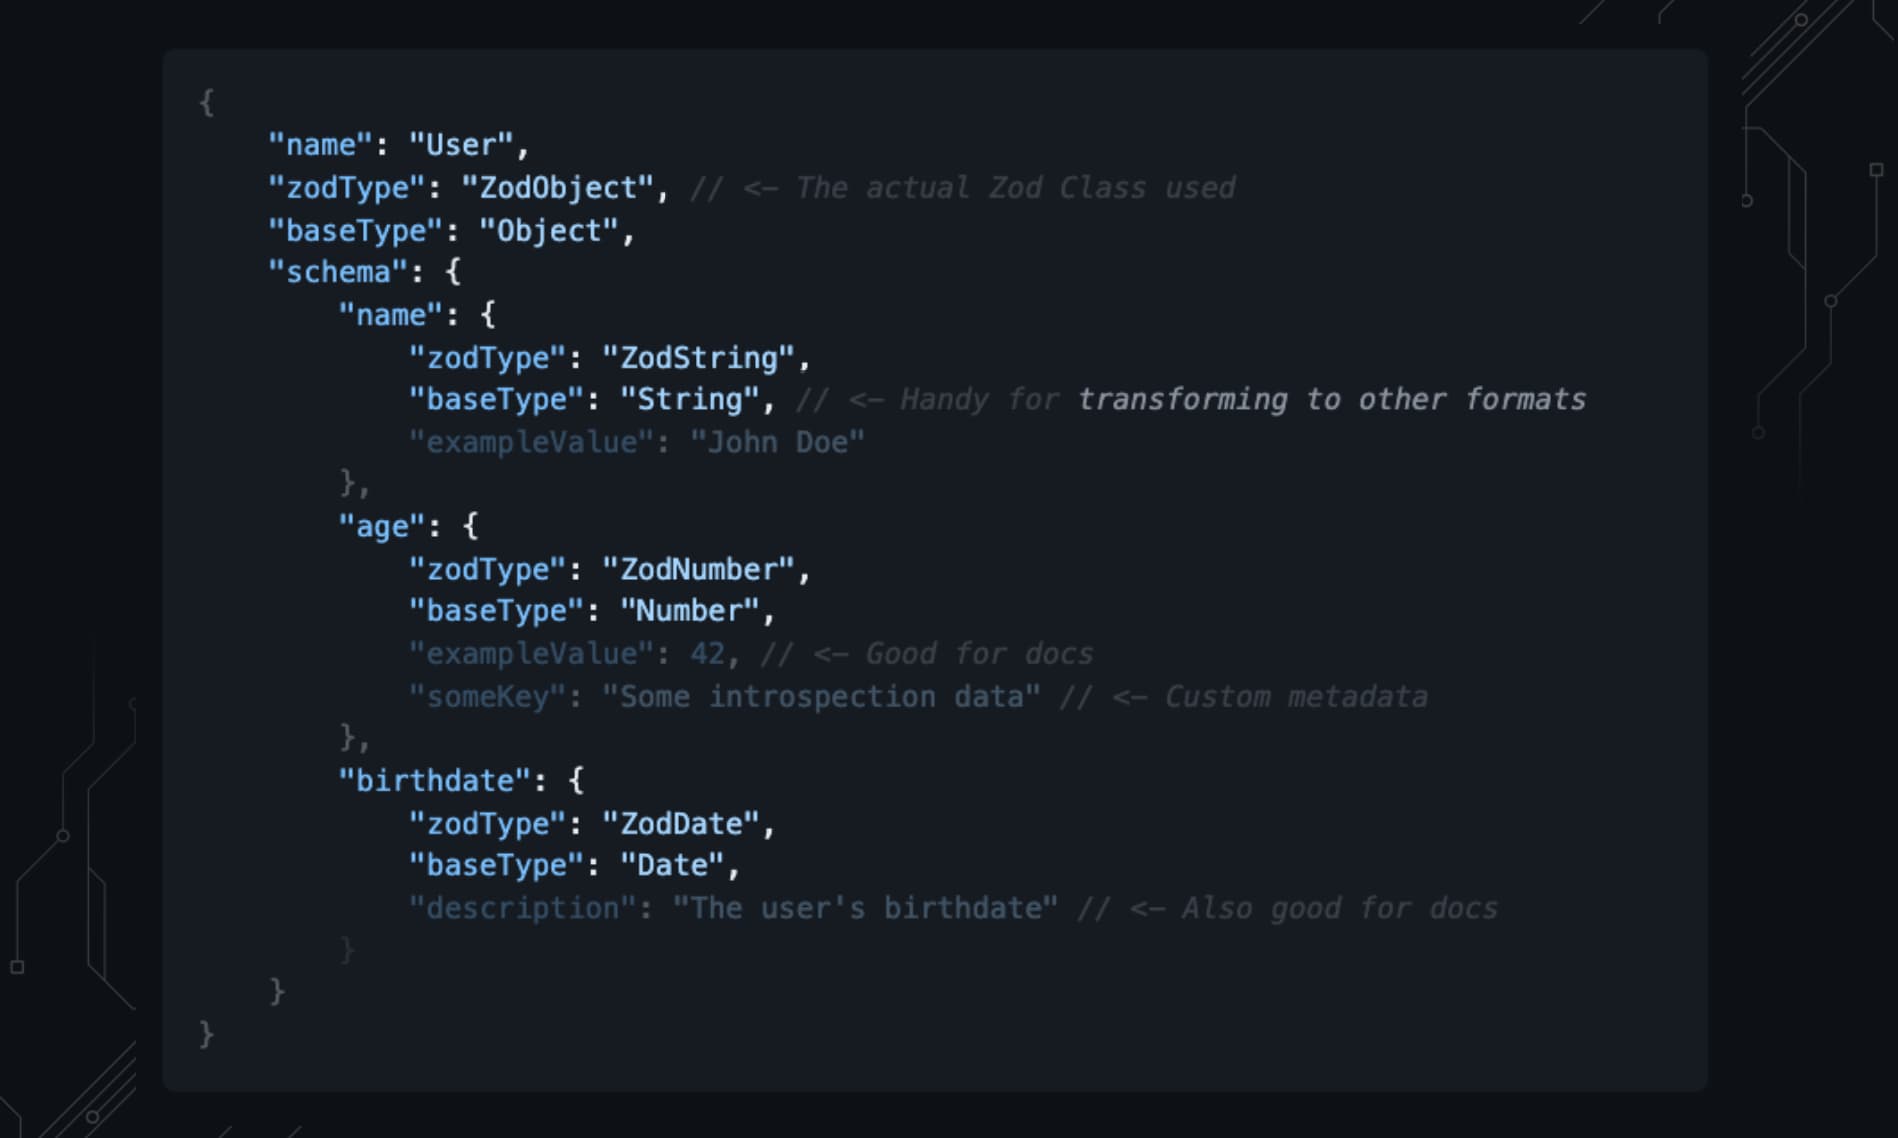
You'll see that next to our exampleValue and description, we also get all our defined basic metadata.
Important things like what the base type is, so we can transform to those other formats.
Transforming to e.g. Mongoose / DB Models

The way this typically works is that you define a transformation function.
You provide it with a Zod schema, and it returns (e.g.) a Mongoose DB model that infers the types from that schema.
Internally, you're mapping the introspection metadata to whatever (e.g.) Mongoose expects.
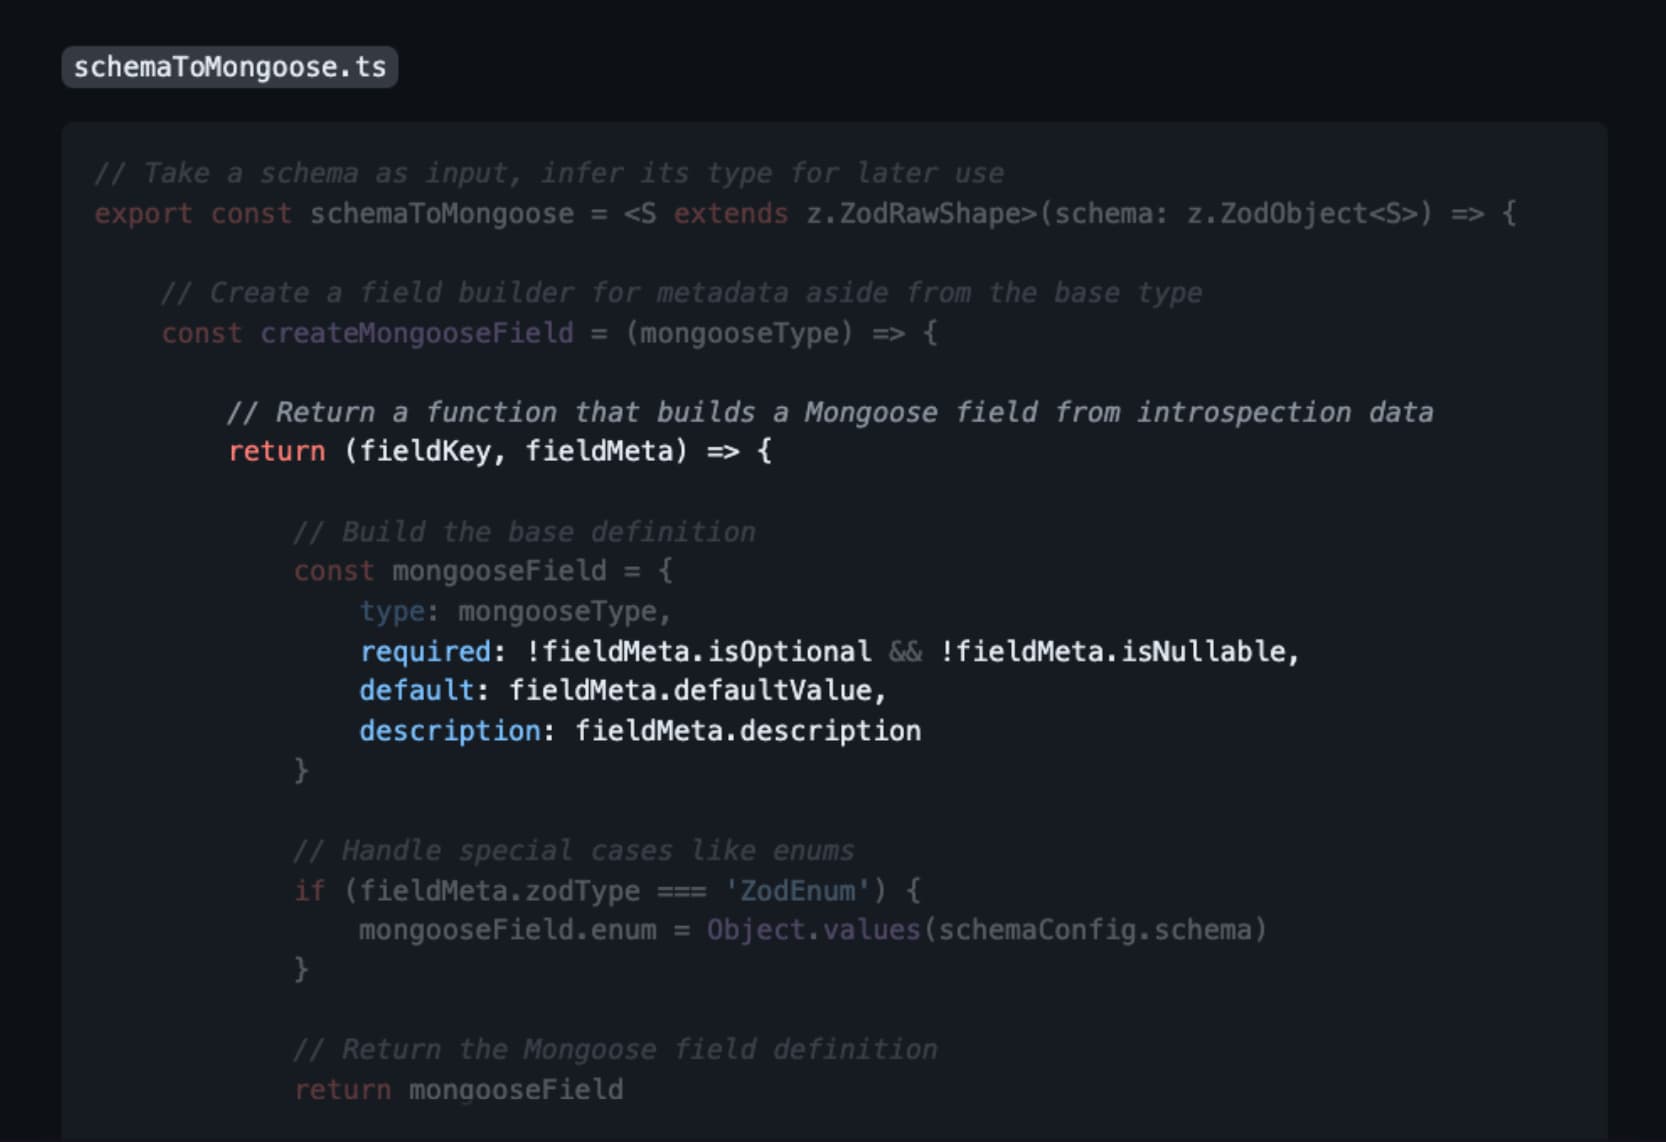
At the most basic level, you'd have to map the base types to the DB definition types:
For Mongoose, which uses the native JS classes, that would look like:
'String'->String'Number'->Number'Boolean'->Boolean'Date'->Date'ID'->mongoose.Schema.Types.ObjectId
In the end, you'd just have to provide your schema to your schemaToMongoose() function:
![]()
The result would be a Mongoose model that is fully typesafe and infers the types from your Zod schema.
Now, even your DB models are in sync with your validation schemas.
Automating UI docs - Single Sources of Truth for React Props
If you we're in a room full of engineers and asked them "How many of you enjoy writing documentation?"
You'd probably get a lot of blank stares, maybe a few laughs.
Yet developers love when tech they use IS well documented.
And they should, precisely because:

Good docs avoid fustration and people re-inventing the wheel.
If you asked your room a followup question like "How many of you feel like you get the time to write good docs?"
Well, there probably would not be many hands up in the air.
So, it becomes interesting to derive good interactive docs from e.g. your Zod schemas.
If you were building your docs with Storybook, for example,
this is what a schemaToStorybookDocs() transformer might look like:
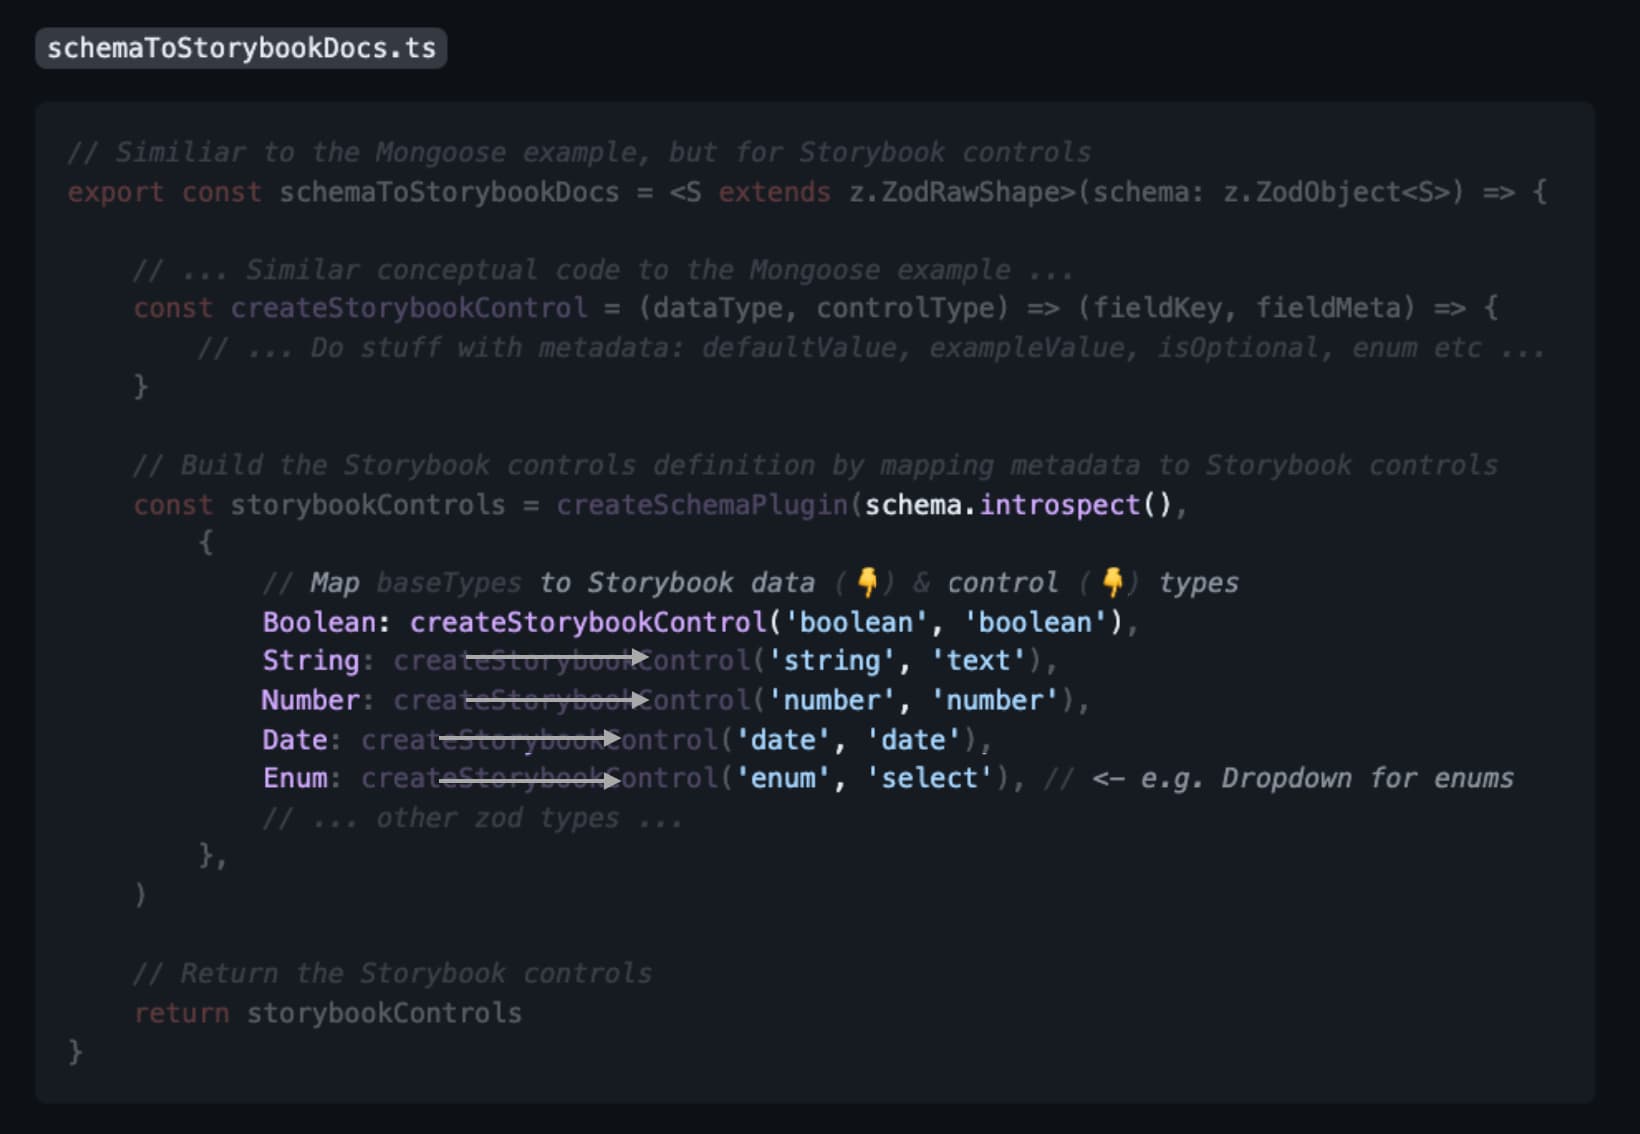
The idea is the same.
You introspect your Zod schema and map your resulting Metadata to whatever Storybook expects.
In this case, it helps us map to the Storybook interactive controls.
Have a TS script spit it all out into an MDX file that Storybook picks up, and you'll have a fully interactive prop table:
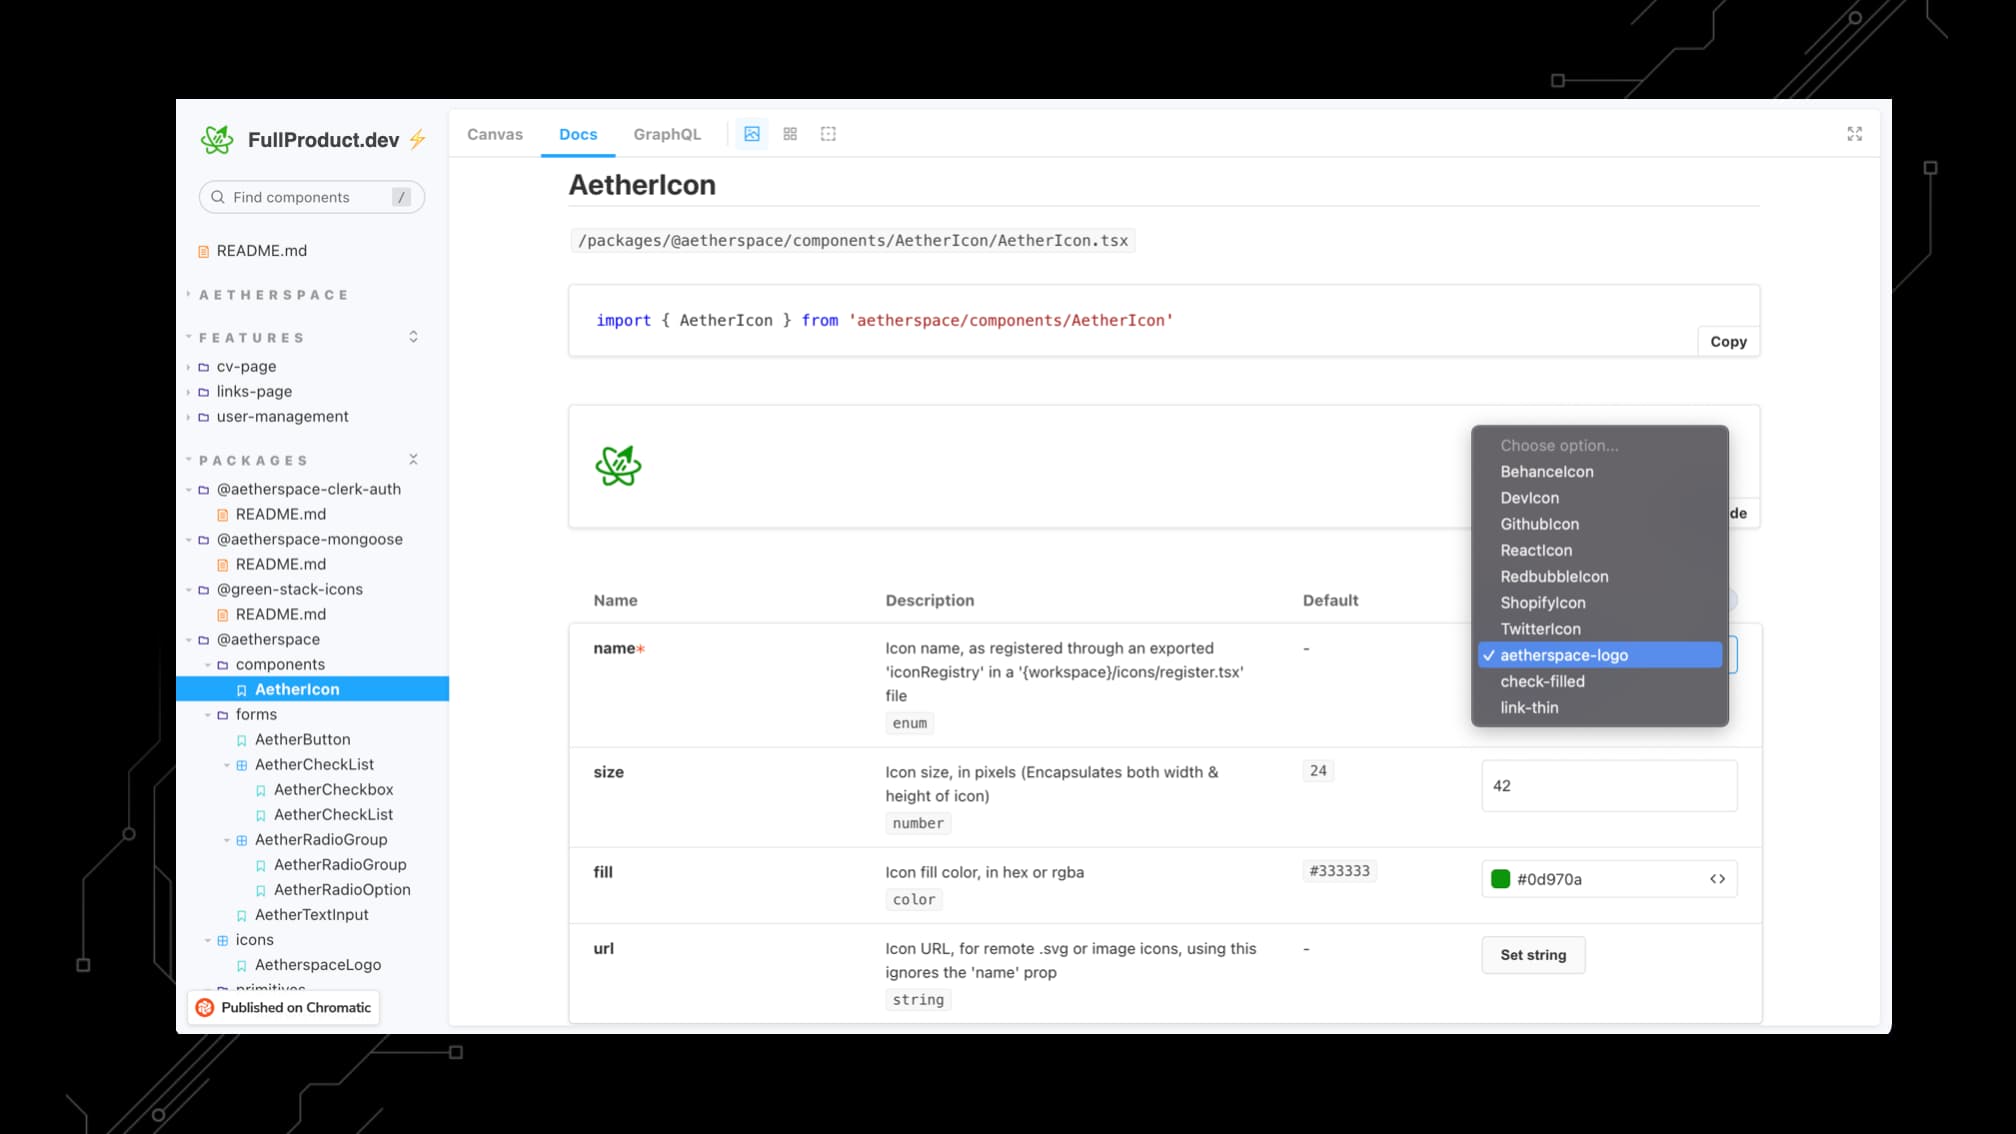
The way I love to structure these types of fully generated docs, and the way I'd recommend you do too:
- Start with some metadata about where the component file is located + how to import
- Show a live preview of the component
- Button to preview what the code looks like based on the props + button to copy that code
- Table with all the props, descriptions, their types, and default values
- Fully interactive controls for each prop that updates the live preview, and the code you can copy
Even better, any updates to the controls in your prop table could also update the URL:
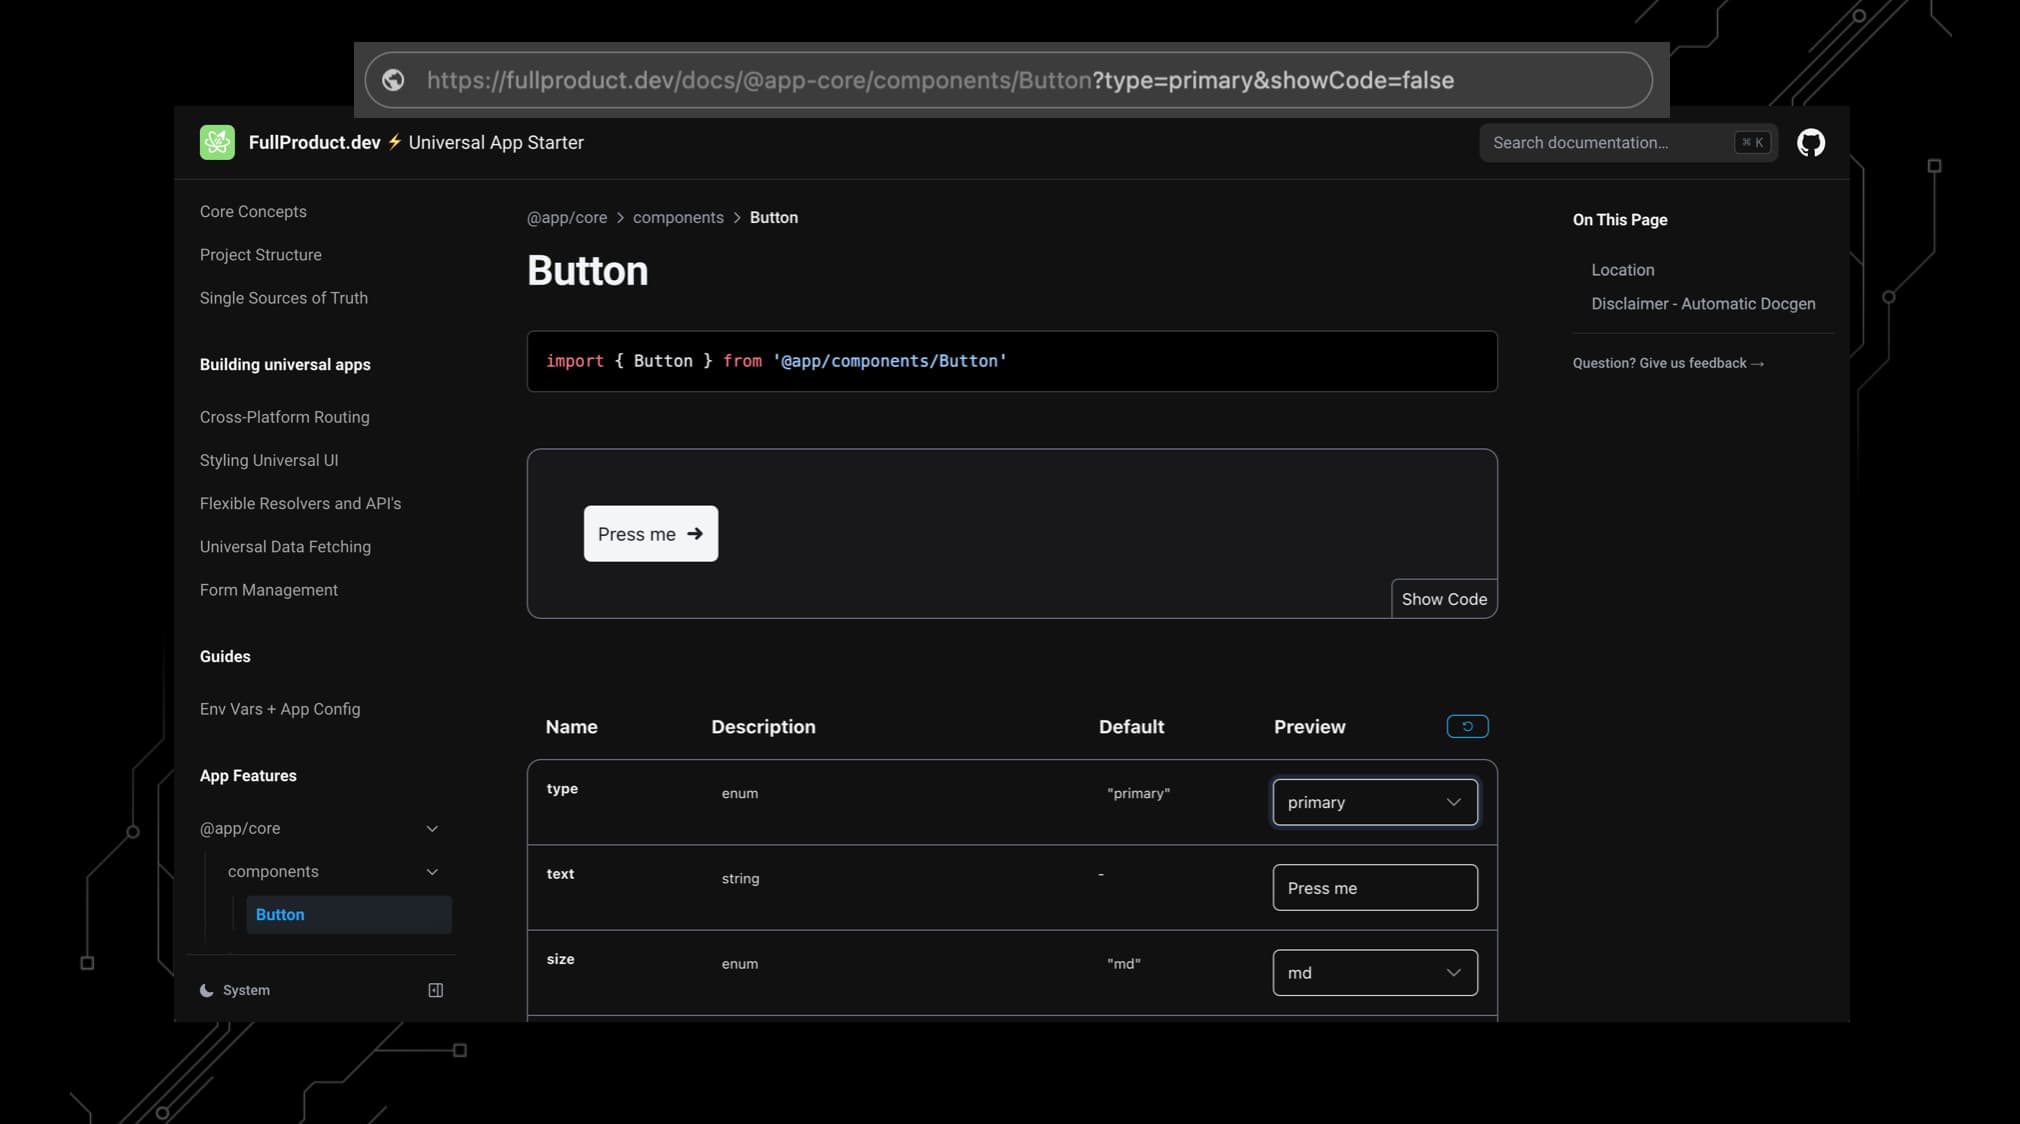
FullProduct.dev, and projects started from it, already have these URL shareable Nextra docs included 🙌 - (demo)
Imagine a coworker needs some really specific examples or state for a component.
You'd just configure the controls until the preview matches and send them the link.
This and docs that grow automatically with your project ensure:
- Easy onboardings for new devs to your team
- Better handovers to clients / their teams
Moving on, this transformer pattern technically works for anything...
My final and favorite example being:
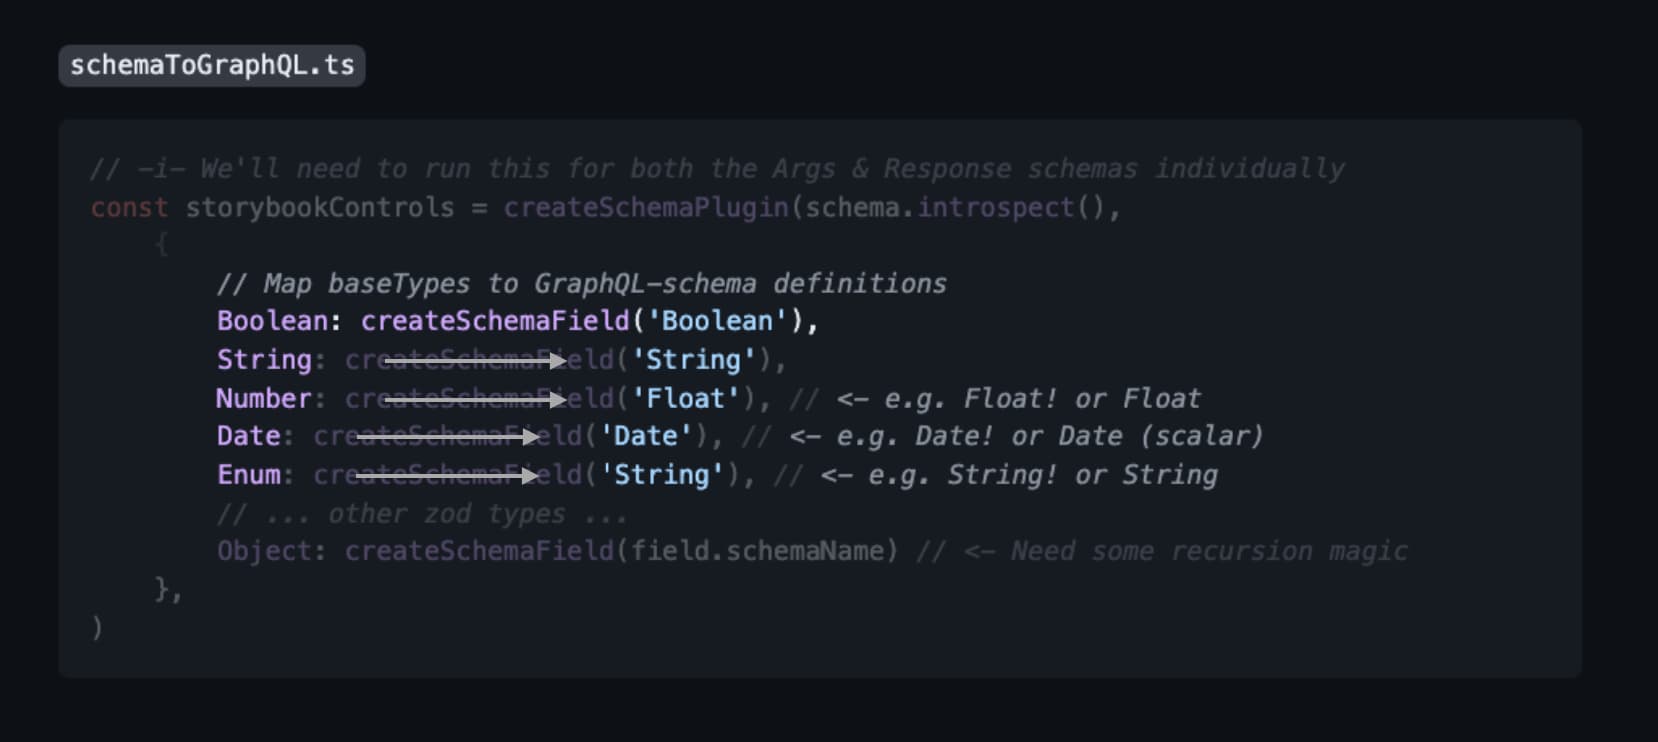
Building a Self-Documenting GraphQL API
One final time, we will:
- Add metadata to your Zod schemas with
.example()/.describe()/ etc. - Call
.introspect()in aschemaToGraphQL()transformer - Map the introspected metadata to whatever GraphQL expects (e.g.
NumbertoIntorFloat!) - Have a script spit out the GraphQL schema
Here's what that mapping could look like:
There's a few extra steps to get to a working GraphQL API ofcourse...
But our Starterkit comes with a full-blown system that already does this for you:
schemaToGraphQL()transformer to generate theschema.graphqlfile- Combines your input + output schemas with resolvers to make that schema executable and typesafe (see docs)
- Sets up the GraphQL API with Apollo Server
- Optionally caffolds out your graphql query calls, so you don't necessarily have to write them by hand either 🙌
This gets you a fully working GraphQL API in sync with your zod schemas.
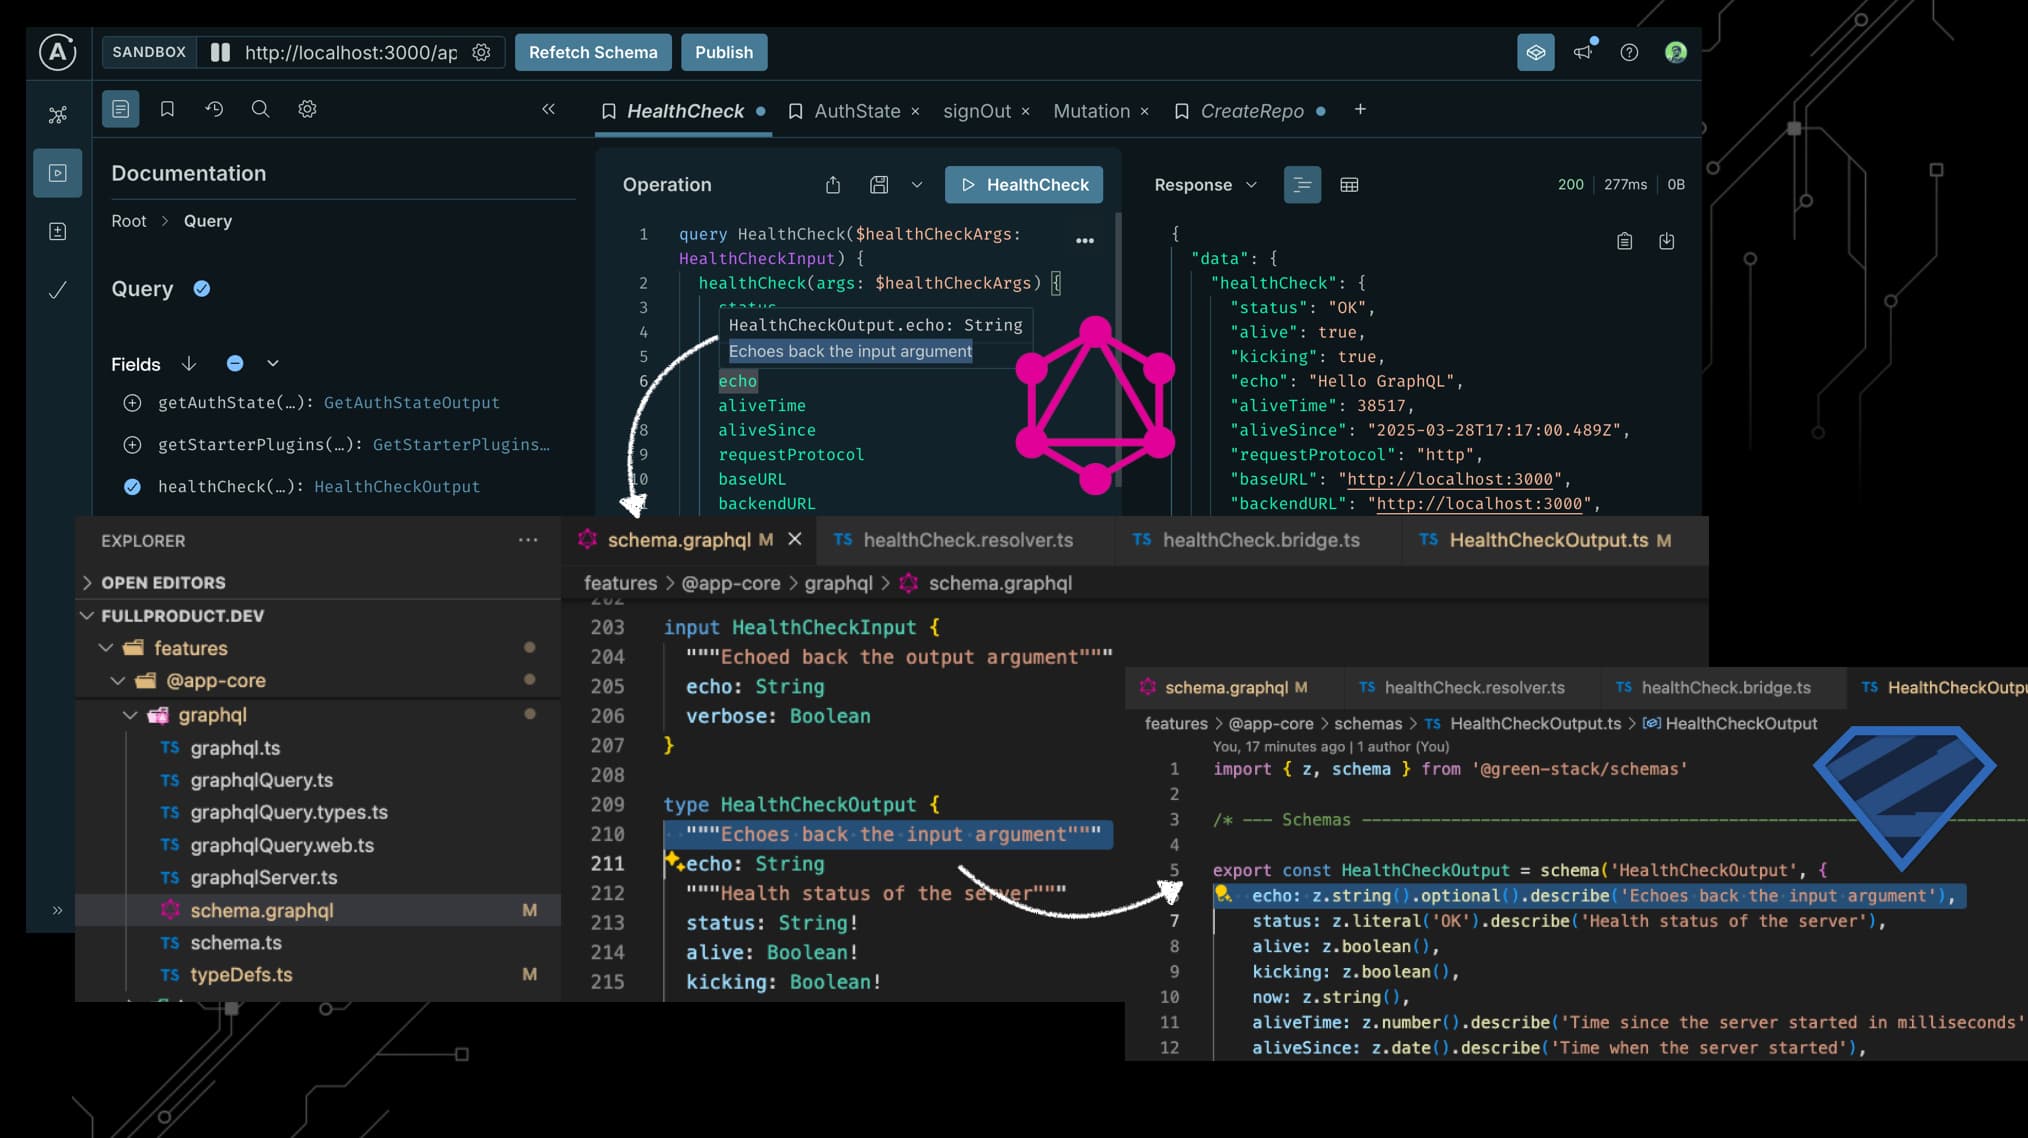
Here, you can see the self-documenting nature of GraphQL in action. It hints the types, fields and descriptions from the GraphQL schema. Which all got generated from our Zod schemas.
Next to self-documenting UI components, we now also have a self-documenting GraphQL API.
Universal Data-Fetching - React-Query with GraphQL / tRPC / API routes
Now that we have that GraphQL API, we're ready to see how we can fetch data on each platform / environment / device.
They way I typically do this is as follows:
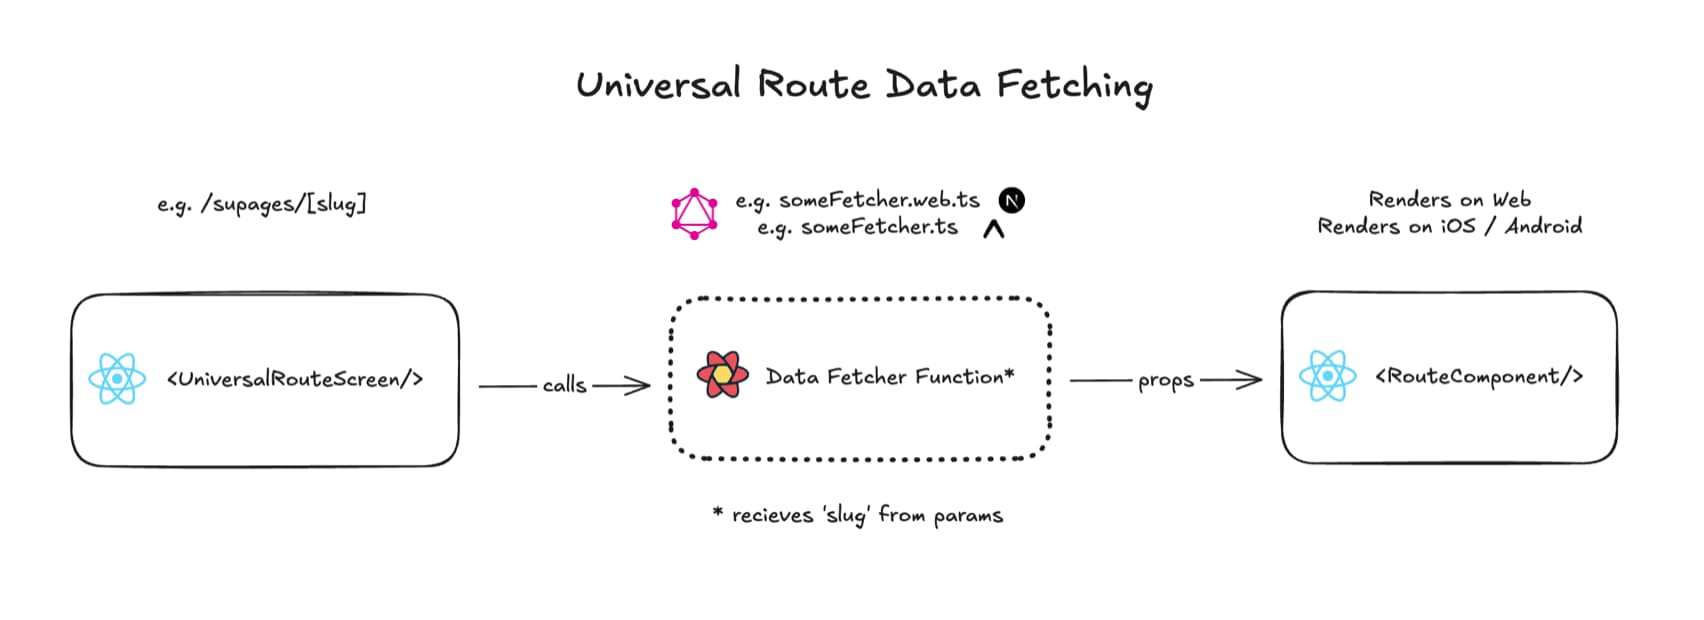
-
- Expo or Next.js app routes 👉 Provide params to a
<UniversalRouteScreen/>component
- Expo or Next.js app routes 👉 Provide params to a
-
<UniversalRouteScreen/>callsreact-queryhook with a universal fetcher function provided with the params
-
- The fetcher function response is cached by
react-queryand passed as props to the route's Screen Component
- The fetcher function response is cached by
Supporting SSR and SSG - serverside data-fetching
One reason we recommend GraphQL is because it's a great choice for fetching not just client-side, but on the server too:
Think of all the environments you need to fetch data in:
- Server-side rendering (SSR) in Node / Next.js
- Static site generation (SSG) in Node / Next.js
- Browser-side rendering (CSR) in Next.js
- iOS and Android with Expo
It's best to abstract a universal way to fetch data in each of these:
Client-side this is pretty straightforward. It's just fetch calls to your API.
But server-side, it's really handy to just be able to call your GraphQL API through your executable schema.
Ofcourse, if you don't care about an external self-documenting API, tRPC is a great universal alternative.
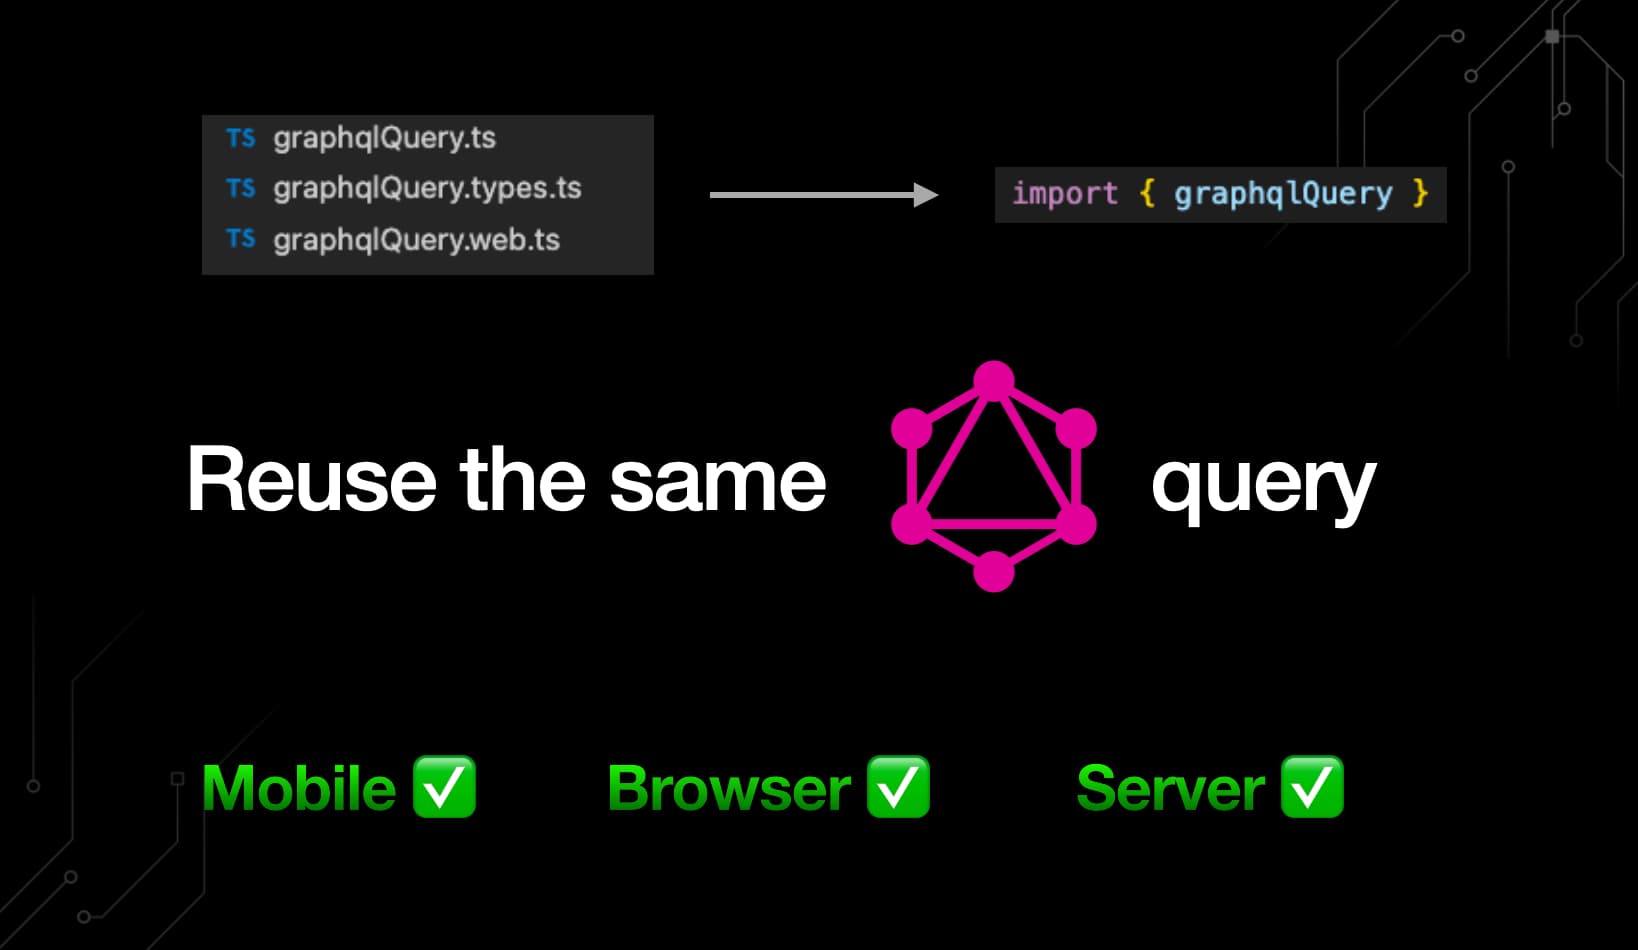
Browser / Mobile data-fetching with react-query
That's all good and well for initial data fetching, but what if you need to fetch after the screen has mounted?
What if you need to fetch or update data then?
Well, it's really no different than using react-query in a regular React app:
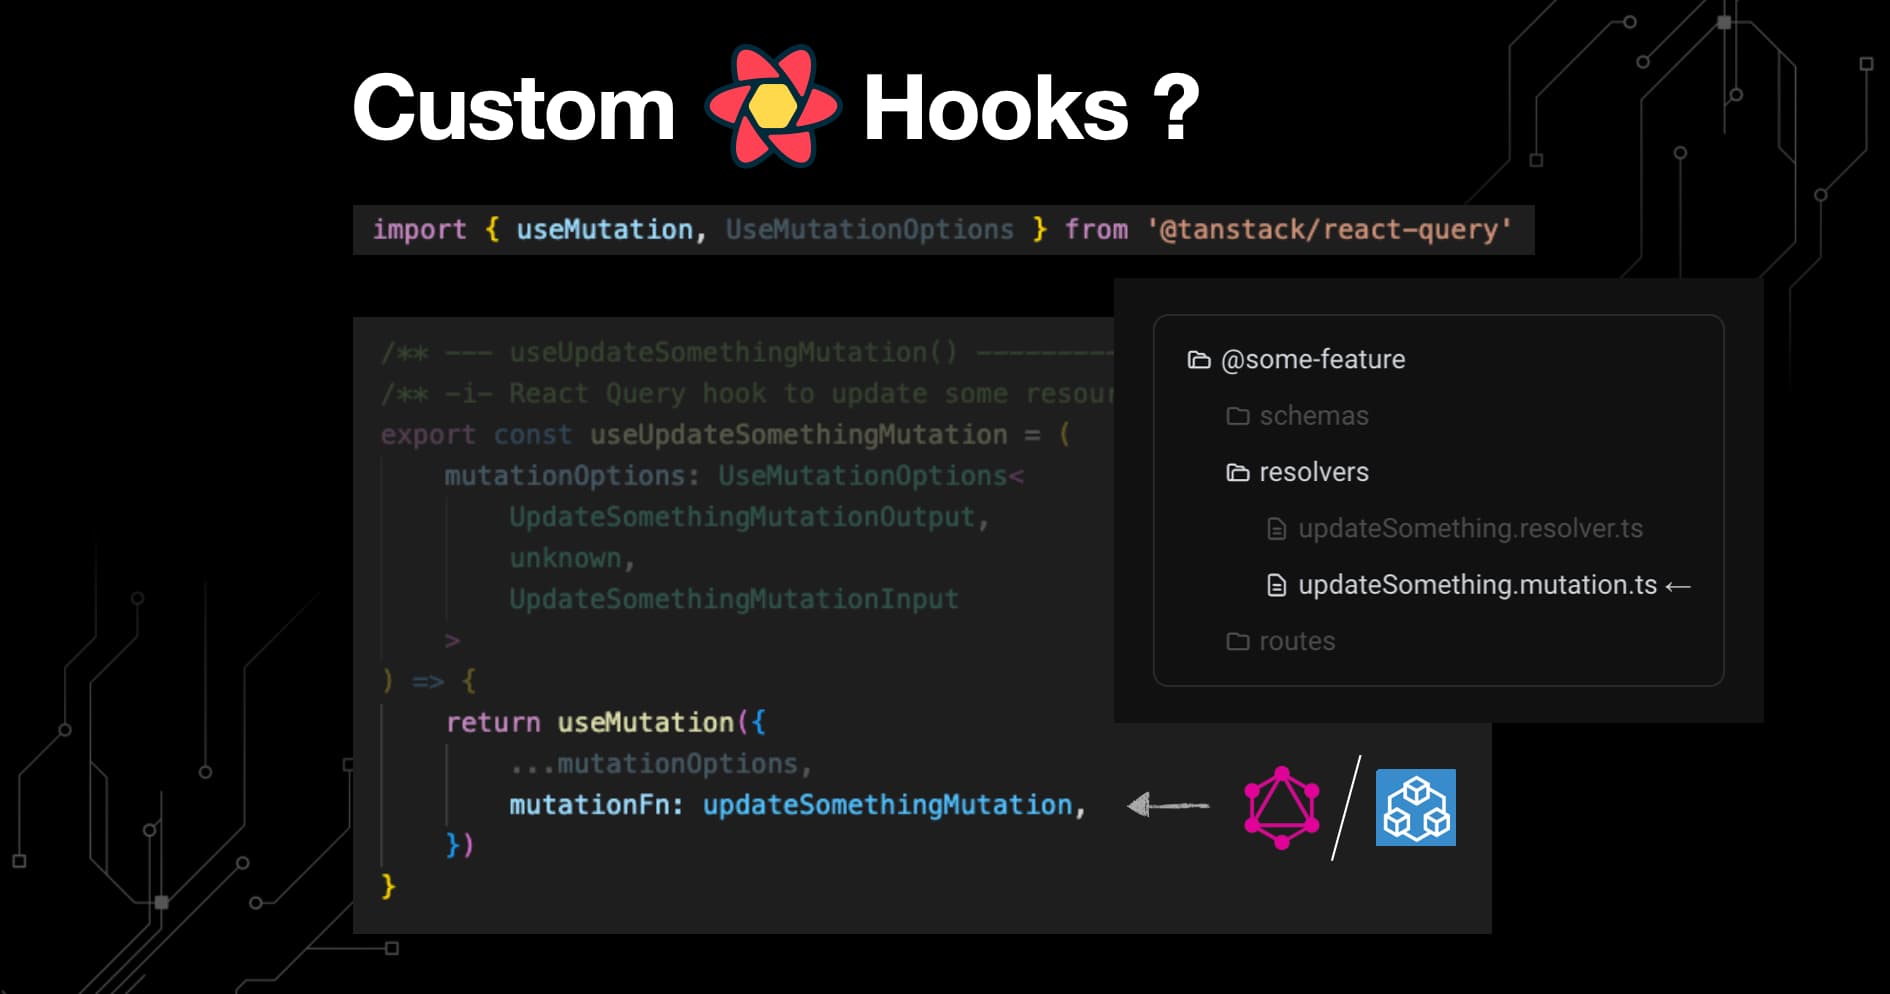
Though you're probably better of using a universal query / tRPC fetcher function here too.
Wrapping up with building the right abstractions, you might think that this is a lot of work.
You'd need a bunch of transformers, and remember to call them with your Zod schemas in other files.
But, the good news is that FullProduct.dev already has a lot of these transformers built-in.
For the boilerplate code required, well...
Tip #5 - Proper Code generation
You know what 'reusable patterns', 'good abstractions' and 'file-based routing' help make really great?
👉 Automating boilerplate code generation
Sure, you could use some fancy AI rules or prompts to do this for you.
But what about good old-fashioned code generators?
Personally, I think they're better for this job than AI is.
They way I typically do this is using Turborepo Generators to ask some questions, e.g. for adding a new schema:
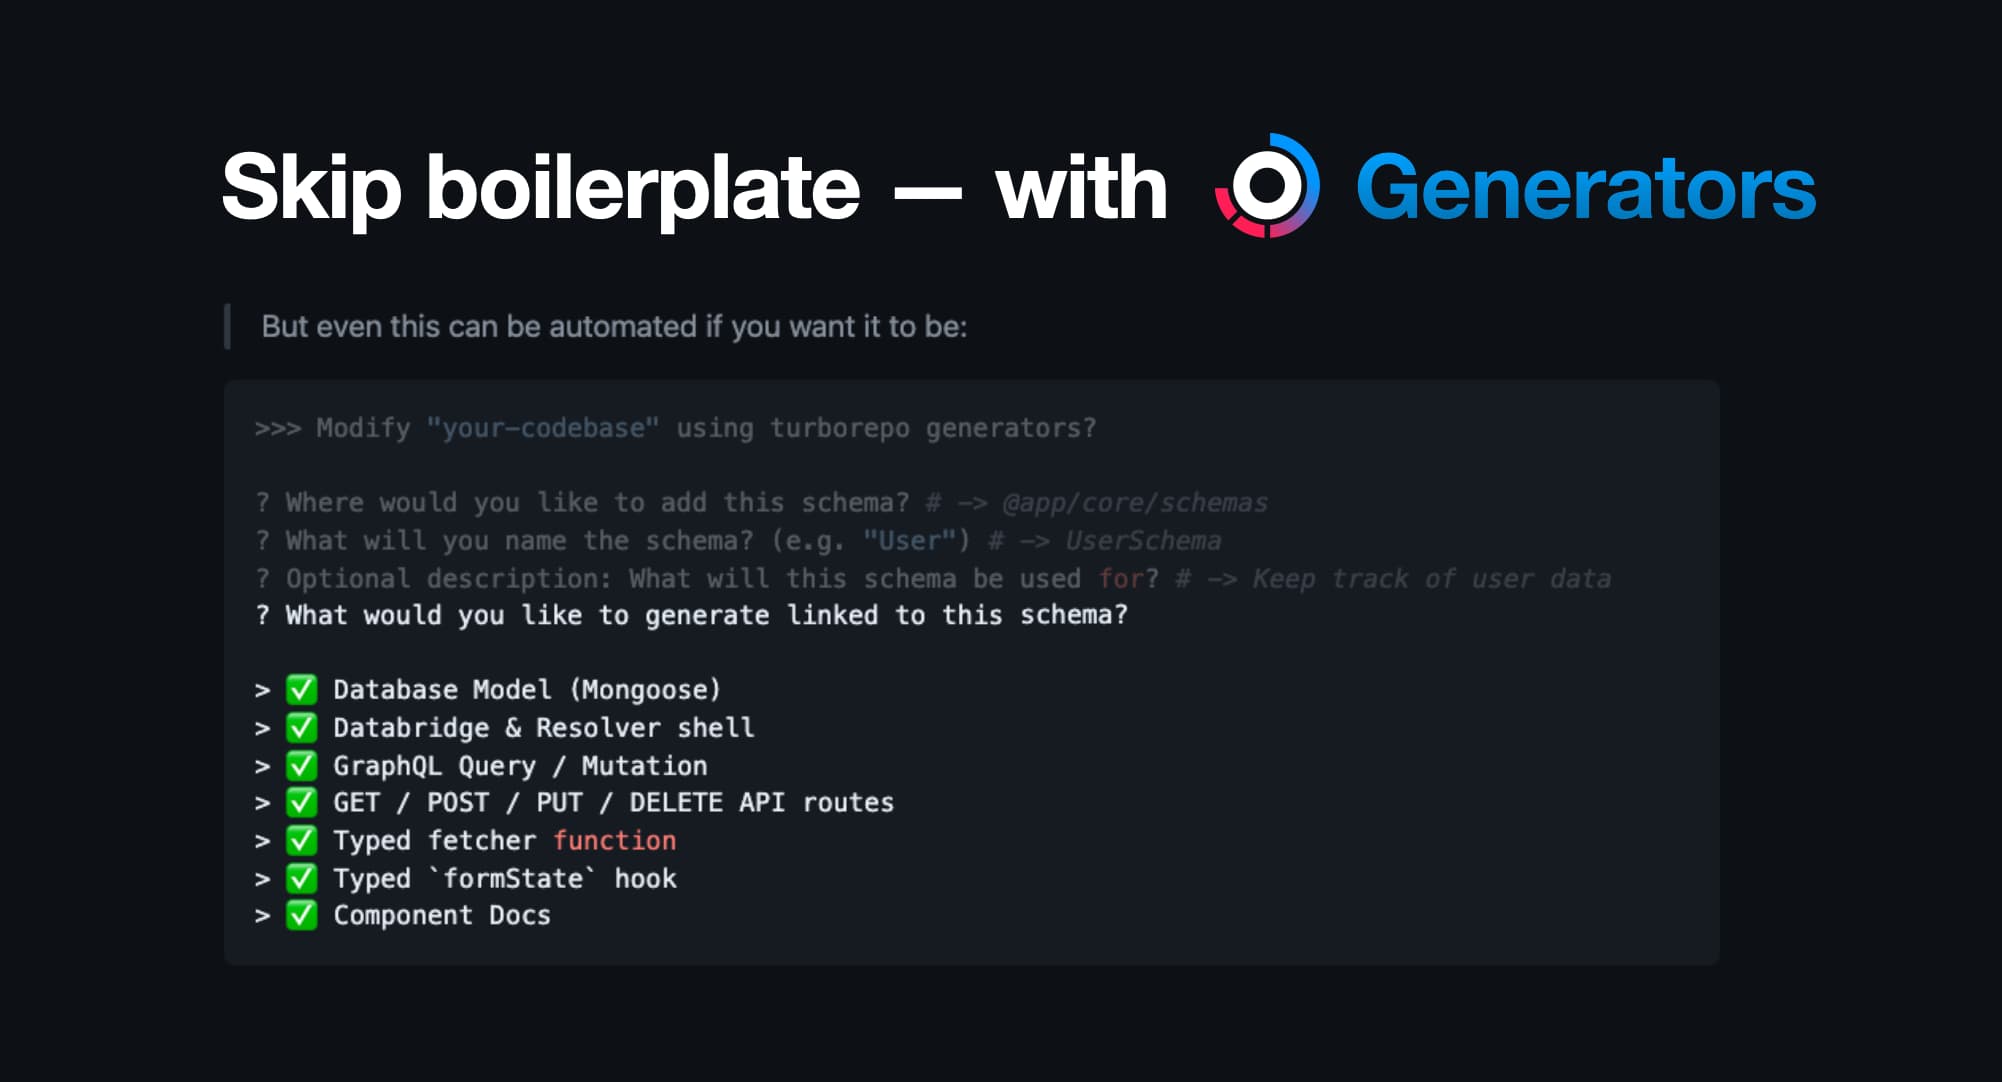
In this example, the most important question is what relevant files + boilerplate code you'd like to generate when adding a new schema.
There is 1 caveat. While generators are great for automating boilerplate, it does not generate any actual business logic.
Luckily there's something else 'good patterns', 'abstractions', and 'file based routing' help make better...
If you can fit it all into the prompt / context window, you'd get some pretty good AI codegen too.
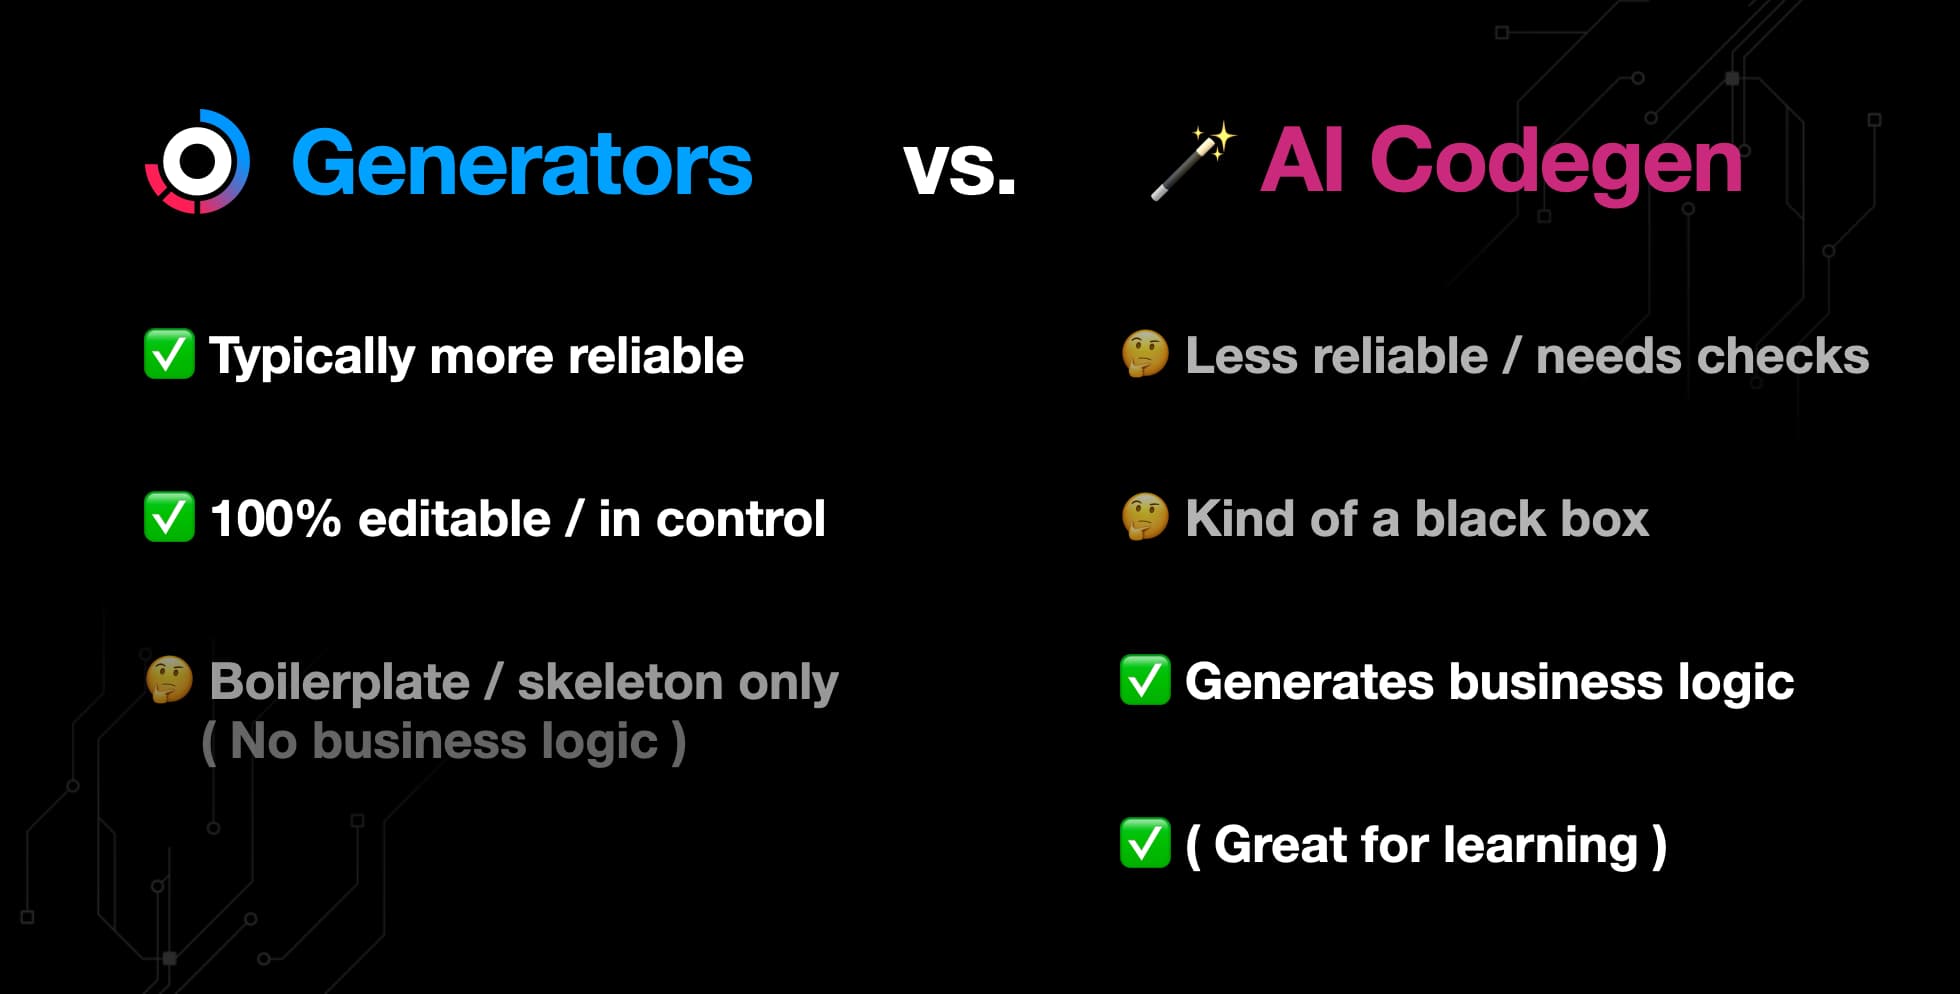
Using generators to set up the empty skeleton files actually helps AI tools like Copilot fill in the business logic better.
Your claudes or cursors will simply start out with a better understanding of the context already.
In the near future, we'll further help you by adding AI rules and prompts through a plugin you can merge into your repo.
Until then, that's it for using codegen to increase your efficiency. Which leads us to the final tip we'd like to share:
Tip #6 - Reusable feature architecture
This is the main thing I felt was missing in my entire dev career building web + mobile apps in different coding environments.
Let's face it. Most features are not super reusable across projects.
Sure, there have been some advancements into components designed for copy-paste:
- Tailwind + TailwindUI
- shadcn/ui
- NativeWind
- React Native Reusables
However, when it comes to copy pasting entire features instead of just UI, things get trickier.
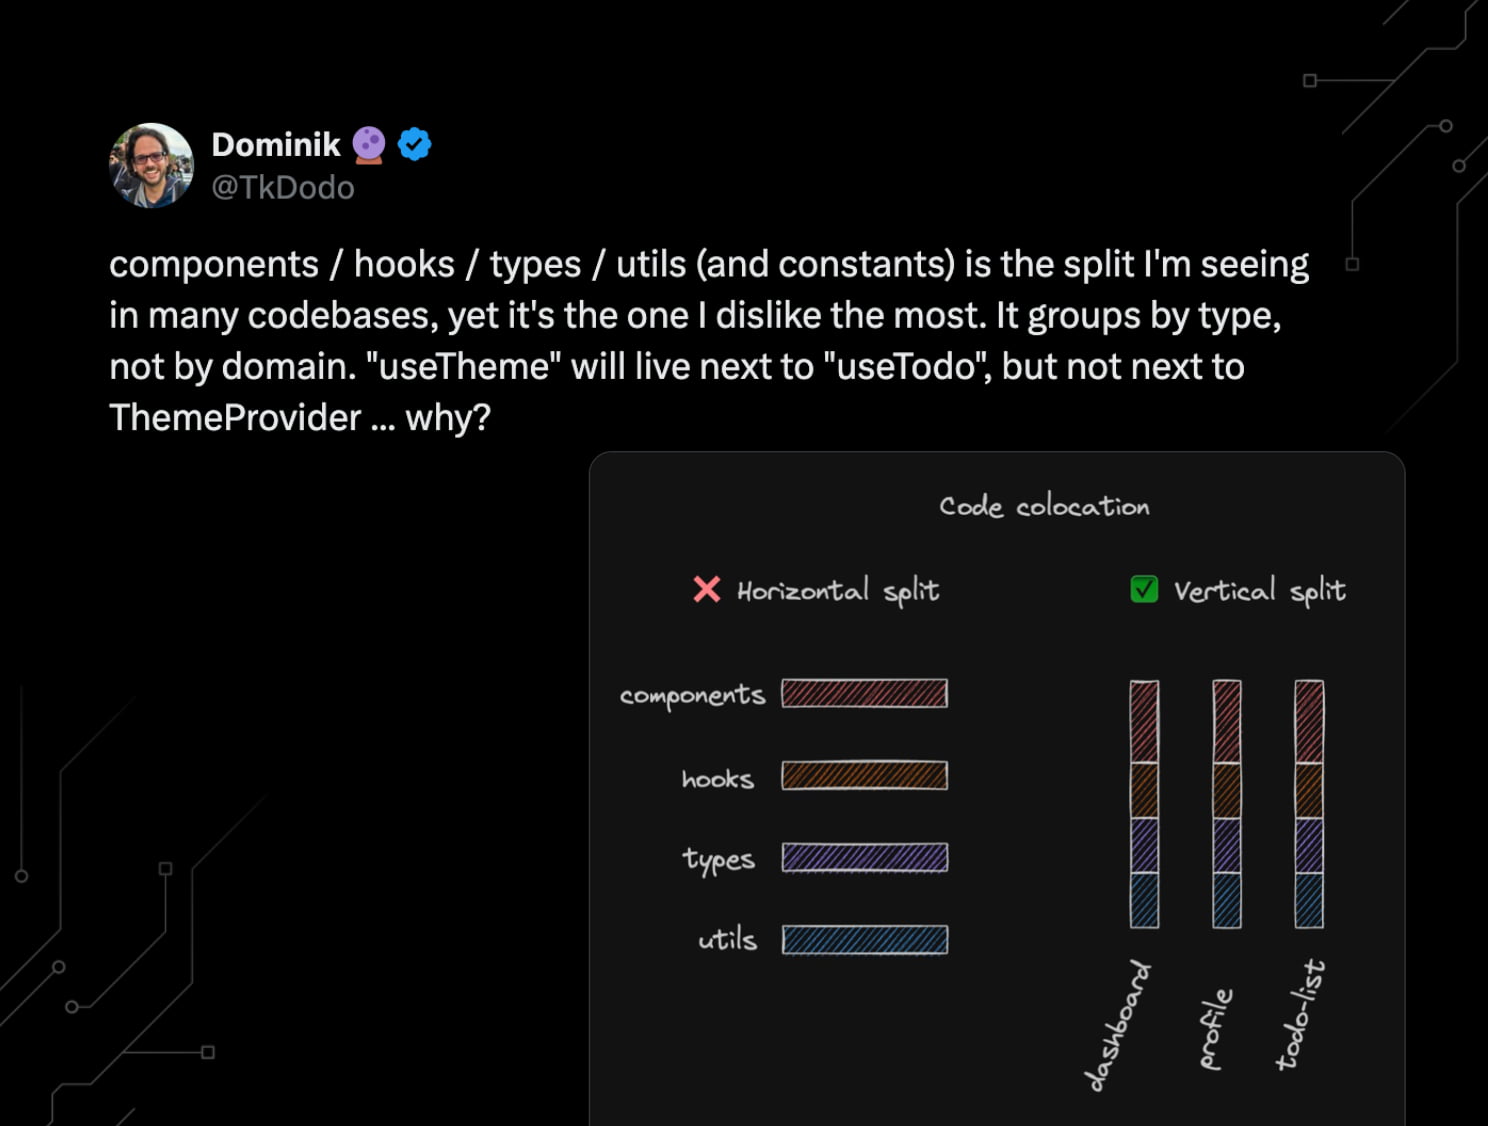
The reason is often a horizontal vs vertical split.
Likely the back-end and front-end code is already split into folders, and you continue dividing by domain from there.
The obvious problem that arises when you do want to reuse a feature in another project is that it becomes a chore of copying from 10+ different folders to scrape it all together again.
It's often much better to colocate your code by feature, including all front-end and back-end code.
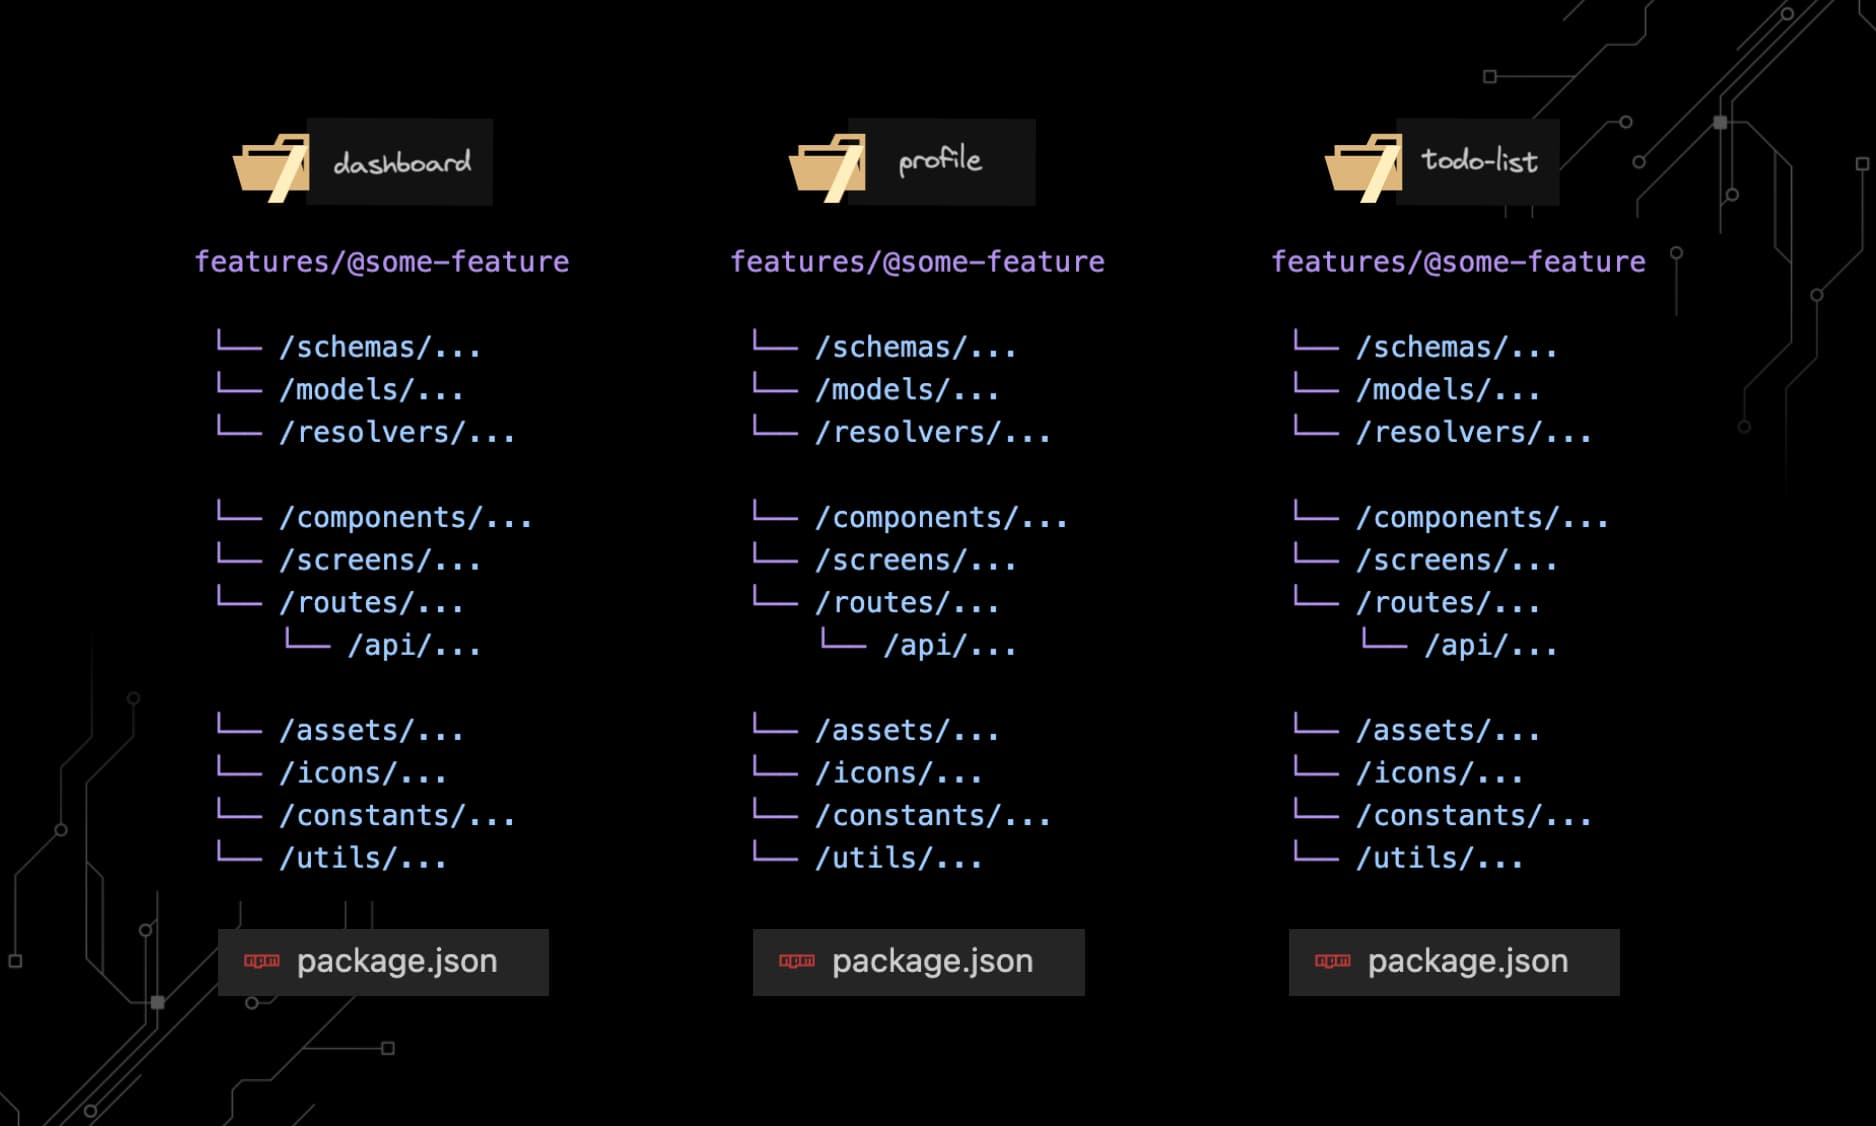
Colocate code with Feature Workspaces
Colocating by feature becomes even more efficient when you consider that each feature can be its own workspace.
Meaning you can add a package.json to each feature folder, and have them define their own dependencies as well.
If you're already using a monorepo to build your app universally with Expo and Next.js, this is a no-brainer.
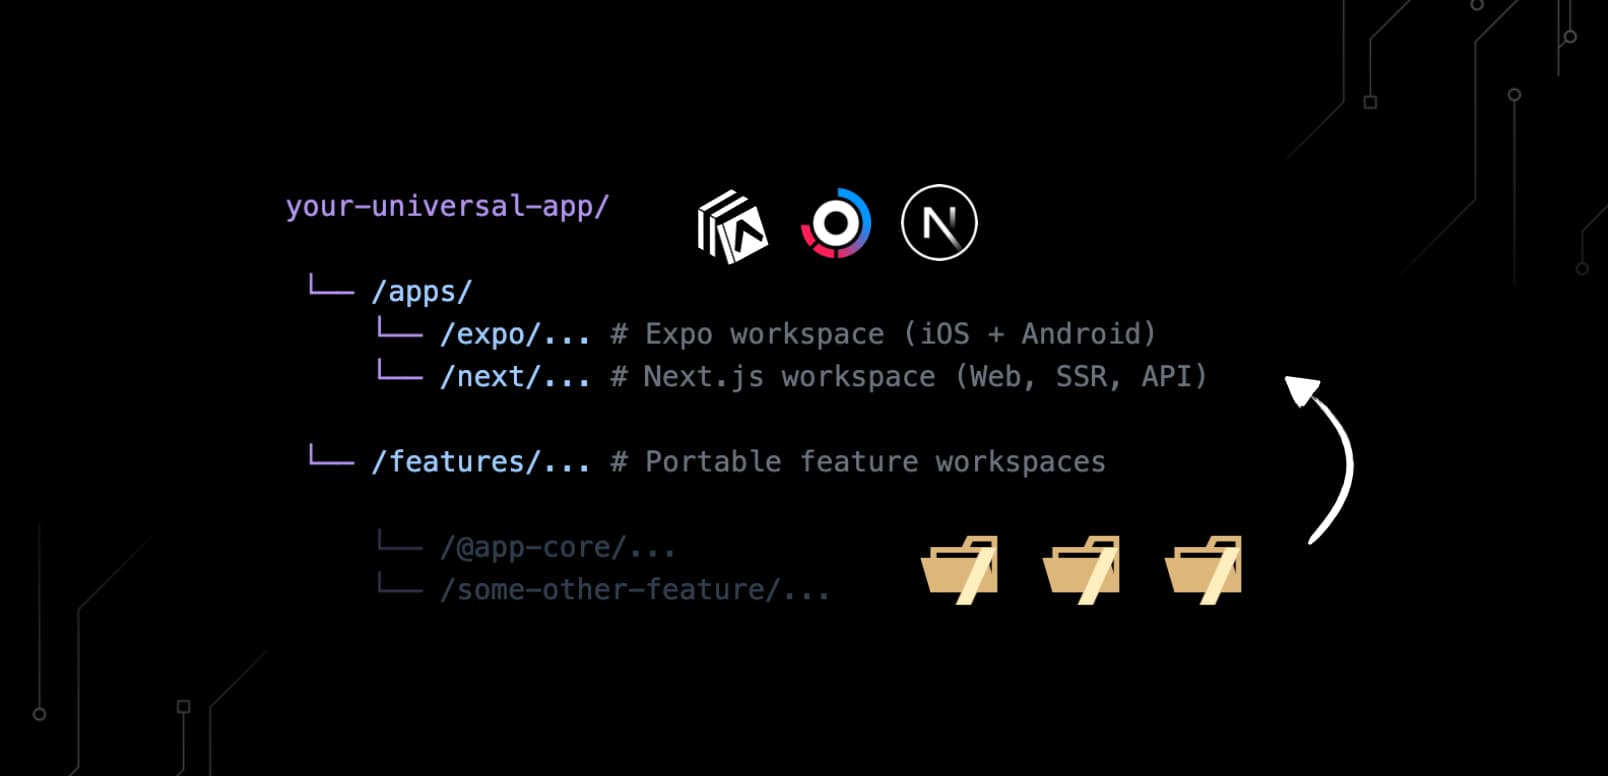
It can be import to still have at least one
@app/coreworkspace that combines all your shared code.
Your Expo + Next.js workspaces can then pull from that shared workspace OR specific features.
Bringing it all together
Now, remember how Expo Router is the first ever file-based navigation solution for Mobile?
Remember how it works super similar to the Next.js App Router?
Well, it gets even better when you consider that for each feature, you could:
- 1️⃣ Define all UI screen code into
/components/->/screens/folders - 2️⃣ Reuse those
/screens/in a feature defined/routes/folder structure (vs. directly in Expo / Next) - 3️⃣ Define all your API routes in a
/routes/api/folder, comprised of/resolvers/(using models + Zod schemas) - ⚙️ Have a Node script re-export everything from your features to the app router folders in both Expo and Next.js
Finally, Expo and Next.js will automatically turn those re-exported routes into Universal Links + Deeplinks
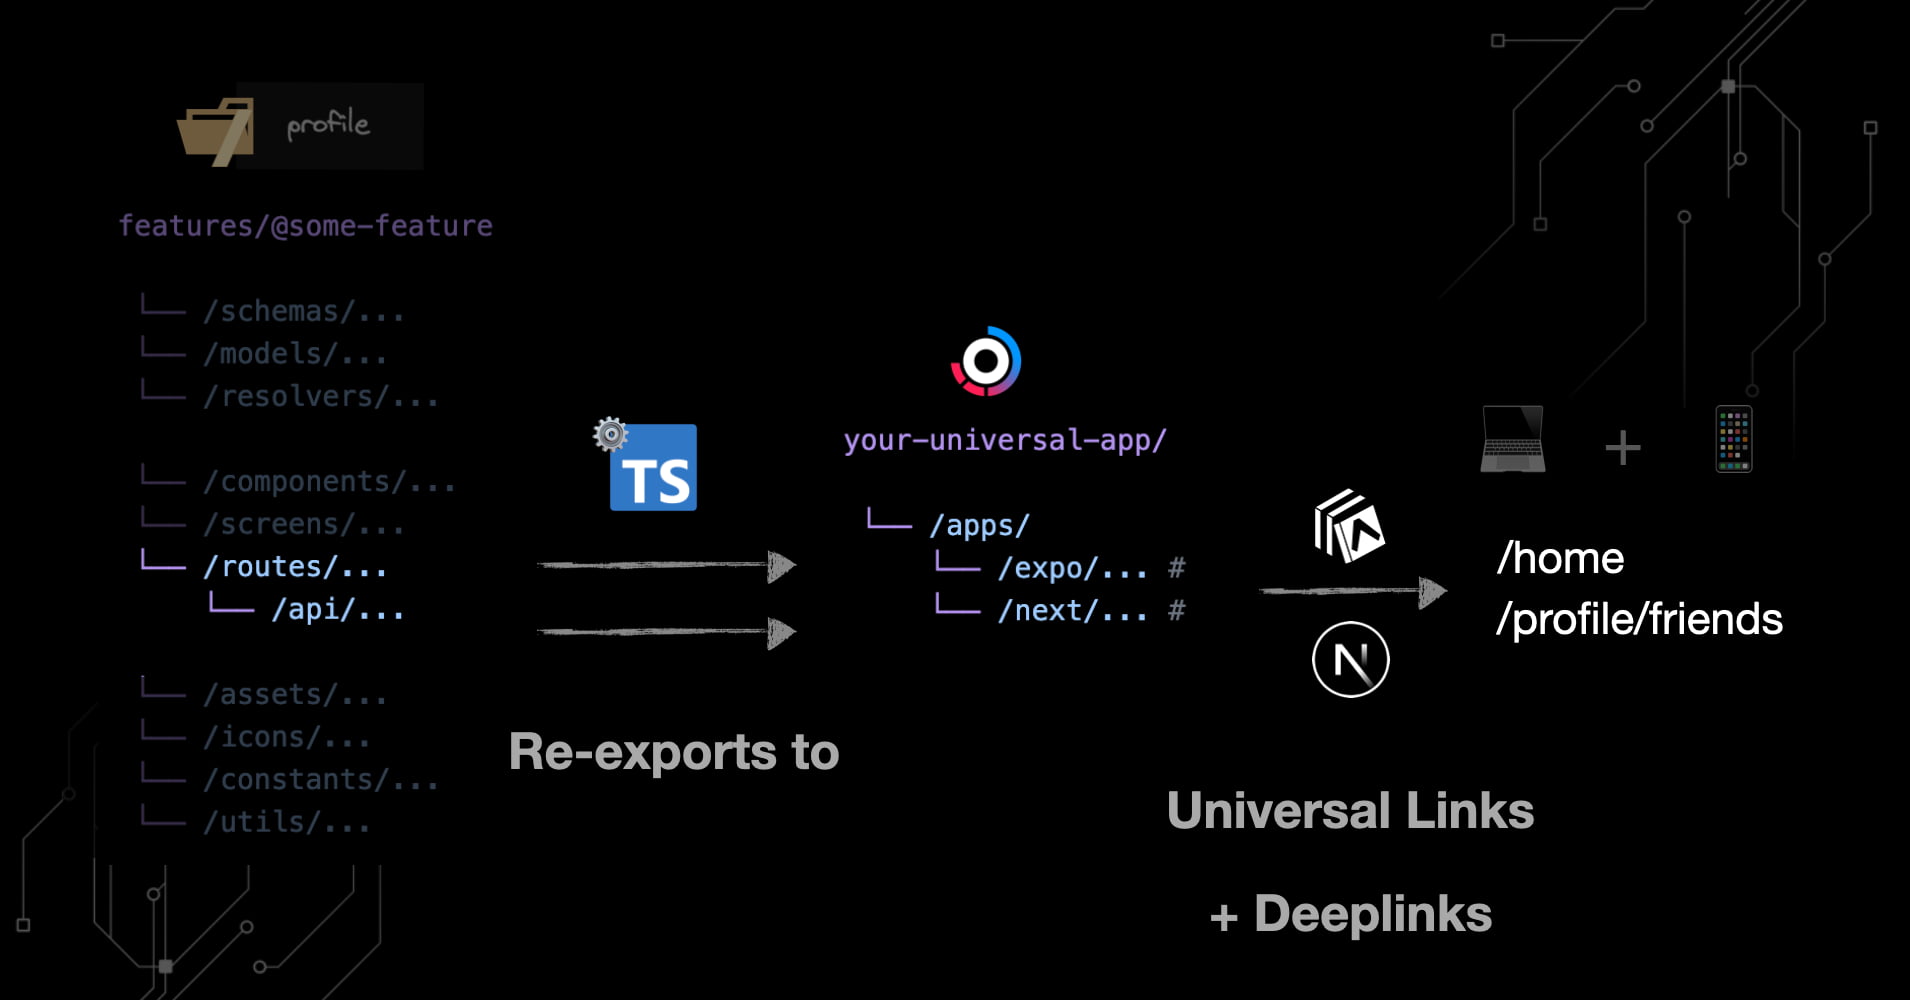
🎉 Congrats, you now have actual reusable feature folders that are designed for copy-paste.
That means, with all these 6 tips combined, you can:
- Start your app universally, in a write-once way, and render on the browser, server, iOS and Android
- Keep all your data shapes in sync, avoiding errors and outdated types / docs
- Build a self-documenting GraphQL API, and self-documenting UI that grow with your project
- Limit the amount of boilerplate code you need to write yourself, with proper code generators
- Keep your features copy-pasteable and reusable across projects
Combine that with AI + a futureproof stack you can perfect your craft with, and you'll be ahead of the competition in no time.
Where can you test this?
We also have a free open-source demo / preview version of the Starterkit available on GitHub.
Ready to get started with some of these concepts? Check out our quickstart guide in the docs.